Page 1 of 2 12 LastLast
Results 1 to 10 of 17

Thread: Delco Alternator question

  1. #1
    Join Date
    Apr 2013
    Location
    Park City UT
    Posts
    167

    Default Delco Alternator question

    Hi All,

    Finally tired of the old dynamo breaking down and not having the juice to power much, so switching to an alternator. Going to use Ike's brackets and probably a Delco 10-SI 63 or 72 amp. Question is should I get a single wire or 3 wire Delco 10-SI? Any other suggestions on this would be good also. I know it has been discussed many times.

    Rob
    68 Series 2a "Bug Eye"

  2. #2
    Join Date
    Oct 2006
    Posts
    1,199

    Default

    Single wire is the easiest install. Just keep in mind that the wiring harness is rated for 15 amps, and there's only one fuse for the entire truck plus an auxiliary fuse (the British glass fuses blow when they reach the exact amp rating they are labeled with). If you're going to run high draw accessories you'll want a separate fused circuit from the battery that's rated for those items. Remember that fuses protect the wire, not the thing at the end of the wire.
    You can set it up with a relay so that the high amp line is only on when the key is in run, or you can just run it as always hot.
    Britishwiring.com has all the proper wire and fittings to give it a factory look if that's the way you want to go. They carry both braided and PVC covered wire.

  3. #3
    Join Date
    Apr 2008
    Location
    The Granite State (NH)
    Posts
    3,435

    Default

    If you want to use a charge warning lamp to tell you if the alternator has failed, get the 3 wire. If you don't care about that, get the 1 wire.

    Speaking personally, I'd put in a 12si if I were going to do an XXsi conversion. Better cooling and up to 94 amp output, though you may not want to draw THAT much output on the stock wiring harness (the alternator only puts out what you demand of it).

    12si Caveat: I don't know whether the larger-bodied alternators will have fit issues with Ike's setup--I just am not personally familiar with his kit nor the 2.25, so check first if you go this route.

    BTW--The best 10/12si information I've found on the web is here: http://www.madelectrical.com/electri...elcoremy.shtml

    Well worth reading the whole page.
    --Mark

    1973 SIII 109 RHD 2.5NA Diesel

    0-54mph in just under 11.5 minutes
    (9.7 minutes now that she's a 3-door).

  4. #4
    Join Date
    Nov 2006
    Location
    Mass.
    Posts
    1,796

    Default

    Go with the 3 wire so you have the idiot light. Wiring is already there for it so it's no real extra effort. Run the output wire from the alt. directly to the battery to avoid running higher amperage through the harness. Go heavy....
    Jason
    "Clubs are for Chumps" Club president

  5. #5

    Default

    I'm pretty sure you can modify the '68 generator bracket to accept the 1x-si series alternators.
    It's been 26+ years since I did one, so my memory may be tricking me.
    Tom Rowe

    Four wheel drive allows you to get stuck
    in places even more inaccessible.

    62 88 reg
    67 NADA x2
    74 Air Portable - The Antichrist (tag 6A666)
    95 D1 - R380
    95 D90 - R380
    97 D1 - ZF

  6. #6
    Join Date
    Apr 2013
    Location
    Park City UT
    Posts
    167

    Default

    Thanks everybody for the information. I've got the bracket from Ike on order and the 10-SI on the way. Question on wiring- I see two versions of connecting the Alternator to the truck. One has the + lead from the Alternator going directly to the battery and another wire from the #2 terminal to the charge light in the dash. Then there are other wiring diagrams taking the + wire to the old voltage regulator with some mods to the voltage regulator. Which is best? If you take the + directly to the Battery then what do you do with the various wires attached to the old voltage regulator?

    Thanks Again,
    Rob

  7. #7
    Join Date
    Apr 2008
    Location
    The Granite State (NH)
    Posts
    3,435

    Default

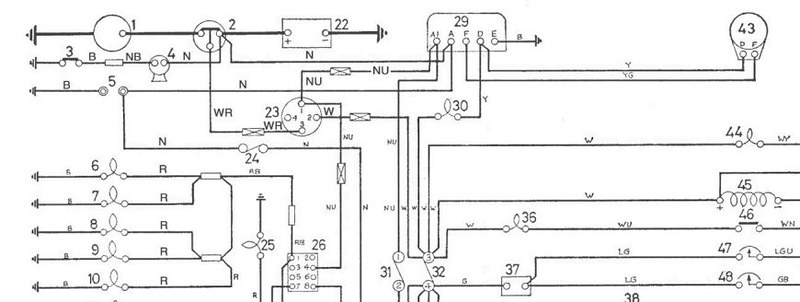
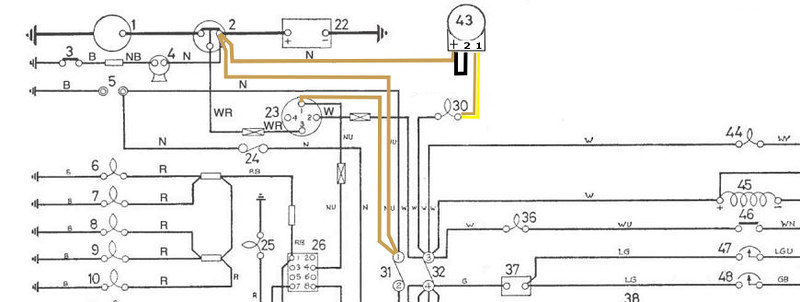
    Well, the 10si is internally regulated, so you don't need the external voltage regulator anymore. Looking at the wiring diagram, you should be able to have the power wire go from the alternator directly to the frightening ammeter or, more safely, to the lug on the manual starter switch (or solenoid, whichever you have). Have the main power feed to the 'always hot' side of the fuse box connected to the post that the + wire from the alternator is connected to. Have the feed to the ignition switch come off of the same place on the fuse panel that the last wire is connected to.


    You're essentially going from this (circuit shows #2 as a starter solenoid, but you can substitute the battery side of a manual starter switch or, heaven forbid, the ammeter if that's what you have):


    ...to this:


    Note that the wire from terminal 2 on the alternator is just looped around and connected to the "+" lug on the alternator. If you wanted more accurate output from the alternator, you'd connect it to the same place the wire coming from the "+" terminal on the alternator terminates, just like it says on the Mad Electrical page I posted earlier.
    --Mark

    1973 SIII 109 RHD 2.5NA Diesel

    0-54mph in just under 11.5 minutes
    (9.7 minutes now that she's a 3-door).

  8. #8
    Join Date
    Mar 2010
    Location
    Banner Elk NC
    Posts
    222

    Default

    Quote Originally Posted by antichrist View Post
    I'm pretty sure you can modify the '68 generator bracket to accept the 1x-si series alternators.
    It's been 26+ years since I did one, so my memory may be tricking me.
    1970 IIA 88" 2.25 gas
    Anyone have any info on this? I have a single wire Delco coming in tomorrow. I removed my old generator. Just wondering if I need to set up the welder and have some material on hand to make a bracket or if I will be ok with the stock brackets. I plan on installing it in the stock location, not up high like Ike's brackets allow.
    Thanks pb

    edit: I have what looks like a 2 piece flat steel type bracket not the one piece that someone featured for the diesel application. That job required a spacer.

  9. #9
    Join Date
    Oct 2006
    Posts
    1,199

    Default

    Just to add to Mark's very helpful wiring diagram above, the brown wire from the starter lug to the alternator should be fairly fat. The fattest I have found in brown is from britishwiring.com. Red wouldn't be wrong either, but not as britty-ish.

  10. #10
    Join Date
    Apr 2013
    Location
    Park City UT
    Posts
    167

    Default

    Just an update on my Alternator conversion. All done with help and info on this thread by our great Members! Ike's bracket works very well. The position of the Alternator up high is far better than the original placement. Ike was very helpful in all this.

    Cheers Y'all,

    Rob
    1968 BugEye 88

Posting Permissions

  • You may not post new threads
  • You may not post replies
  • You may not post attachments
  • You may not edit your posts
  •  
About us
Unparalleled product knowledge. Our mission is to support all original Land Rover models no longer supported by your local Land Rover franchise. We offer the entire range of Land Rover Genuine Parts direct from Land Rover UK, as well as publish North America's largest Land Rover publication, Rovers Magazine.
Join us