Page 2 of 2 FirstFirst 12
Results 11 to 19 of 19

Thread: Defender Rear Bumper/Tow Bar on a Series III 109

  1. #11
    Join Date
    Oct 2006
    Posts
    1,199

    Default

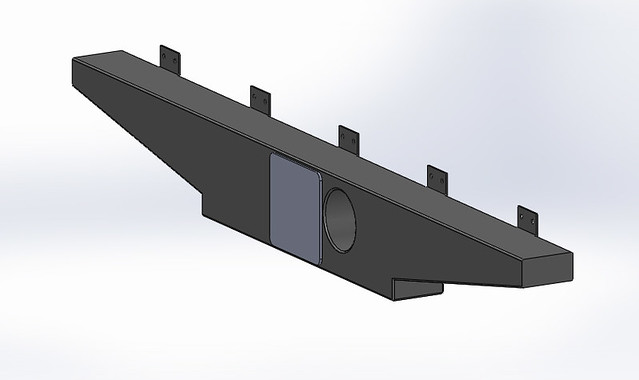
    It's the most painless/sensible way to go, but that design was previously eliminated from consideration as it sticks out too far for the OP's shins, hence the rather complicated PITA setup in my drawing
    Yup that's part of the reason why the tow ball is in upside down, so I don't nut myself on it. However, the thing absolutely doesn't get in the way if you are aware of it.

  2. #12
    Join Date
    Jan 2008
    Location
    Saratoga Springs, NY
    Posts
    75

    Default

    So I took Mark's suggestion and made the smaller version of his design for my 109. And because she is a station wagon, I had to drop the tank to gain access to the rear of the crossmember. With all the parts cut and ready to weld, we dropped the tank, assembled and welded the receiver in to place, and reattached the tank all in one Saturday in the shop. Attached are some pics of the finished product (along with a 7-pin trailer plug with the controller tucked inside the tuffy box up front). And a few pics after blasting snowbanks in -7 degree weather in Upstate NY this afternoon. Thanks again Mark for your design idea. Click image for larger version. 

Name:	FullSizeRender-1.jpg 
Views:	324 
Size:	93.9 KB 
ID:	10594Click image for larger version. 

Name:	FullSizeRender-2.jpg 
Views:	322 
Size:	96.2 KB 
ID:	10595Click image for larger version. 

Name:	FullSizeRender-3.jpg 
Views:	323 
Size:	93.7 KB 
ID:	10596Click image for larger version. 

Name:	FullSizeRender.jpg 
Views:	309 
Size:	128.2 KB 
ID:	10597 Click image for larger version. 

Name:	IMG_3455.jpg 
Views:	321 
Size:	65.6 KB 
ID:	10598Click image for larger version. 

Name:	IMG_3456.jpg 
Views:	297 
Size:	62.0 KB 
ID:	10599Click image for larger version. 

Name:	IMG_3457.jpg 
Views:	315 
Size:	66.1 KB 
ID:	10600Click image for larger version. 

Name:	IMG_3458.jpg 
Views:	333 
Size:	76.2 KB 
ID:	10601


    Quote Originally Posted by SafeAirOne View Post
    ...of course, if you DO want to remove the rear tub for installation, the hitch is a whole lot easier to fabricate and attach by simply welding in. It won't need to be as wide to make up (structurally) for the big hole through the center of the crossmember if the plates are welded to the crossmember:


  3. #13
    Join Date
    Apr 2008
    Location
    The Granite State (NH)
    Posts
    3,435

    Default

    Nice job-- a receiver with no shin-bashing.
    --Mark

    1973 SIII 109 RHD 2.5NA Diesel

    0-54mph in just under 11.5 minutes
    (9.7 minutes now that she's a 3-door).

  4. #14
    Join Date
    Oct 2006
    Posts
    1,199

    Default

    I don't get it. You were so worried about clearance and plowing a rut with the hitch yet there's a (useless) rear step bolted on!

  5. #15
    Join Date
    Apr 2008
    Location
    The Granite State (NH)
    Posts
    3,435

    Default

    Quote Originally Posted by o2batsea View Post
    I don't get it. You were so worried about clearance and plowing a rut with the hitch yet there's a (useless) rear step bolted on!
    That step is the only USEFUL one of the five, I've found (at least for a 3-door 109), and when stowed, barely sticks below the rear crossmember.
    --Mark

    1973 SIII 109 RHD 2.5NA Diesel

    0-54mph in just under 11.5 minutes
    (9.7 minutes now that she's a 3-door).

  6. #16
    Join Date
    Jan 2008
    Location
    Saratoga Springs, NY
    Posts
    75

    Default

    Minimal loss of ground clearance, maximal usefulness for my wife, 4yr old, and 2yr old getting in and out of the back.

    Quote Originally Posted by o2batsea View Post
    I don't get it. You were so worried about clearance and plowing a rut with the hitch yet there's a (useless) rear step bolted on!

  7. #17
    Join Date
    Jan 2015
    Location
    Denver, CO
    Posts
    51

    Default

    Looks good, I will need to go out and check how mine is done as it looks similar. Truck is new to me so I have not had a need to tow anything as of yet.
    Sean
    1971 Series IIA Dormobile

  8. #18
    Join Date
    Jul 2014
    Location
    Santa Cruz CA
    Posts
    232

    Default

    Quote Originally Posted by toga Rover View Post
    So I took Mark's suggestion and made the smaller version of his design for my 109. And because she is a station wagon, I had to drop the tank to gain access to the rear of the crossmember. With all the parts cut and ready to weld, we dropped the tank, assembled and welded the receiver in to place, and reattached the tank all in one Saturday in the shop. Attached are some pics of the finished product (along with a 7-pin trailer plug with the controller tucked inside the tuffy box up front). And a few pics after blasting snowbanks in -7 degree weather in Upstate NY this afternoon. Thanks again Mark for your design idea. Click image for larger version. 

Name:	FullSizeRender-1.jpg 
Views:	324 
Size:	93.9 KB 
ID:	10594Click image for larger version. 

Name:	FullSizeRender-2.jpg 
Views:	322 
Size:	96.2 KB 
ID:	10595Click image for larger version. 

Name:	FullSizeRender-3.jpg 
Views:	323 
Size:	93.7 KB 
ID:	10596Click image for larger version. 

Name:	FullSizeRender.jpg 
Views:	309 
Size:	128.2 KB 
ID:	10597 Click image for larger version. 

Name:	IMG_3455.jpg 
Views:	321 
Size:	65.6 KB 
ID:	10598Click image for larger version. 

Name:	IMG_3456.jpg 
Views:	297 
Size:	62.0 KB 
ID:	10599Click image for larger version. 

Name:	IMG_3457.jpg 
Views:	315 
Size:	66.1 KB 
ID:	10600Click image for larger version. 

Name:	IMG_3458.jpg 
Views:	333 
Size:	76.2 KB 
ID:	10601
    Very nice Station Wagon. What type of wire did you use for the floor on your roof rack.. How did you attach it

    I saw it (wire) in the last picture.

    Thanks

    Josh
    1967 Land Rover 109
    1966 Land Rover 109

    Joshua Tyler

  9. #19
    Join Date
    Jan 2008
    Location
    Saratoga Springs, NY
    Posts
    75

    Default

    Thanks Josh,

    It is fencing used in prisons/corrections facilities called "no climb". Comes in 4x8 sheets. I sourced it locally. It is in 2 sections (slant front, and flat back) and all zip-tied down. I wanted to find something whose bars are close together so that I could #1) put anything up there with out it falling through and scratching the paint on the roof, #2) wanted to be able to stand up there with minimal flex,

    I could have tack welded it down, but decided against it because the whole thing would have been really heavy if ever i wanted to take the rack off. I can now stand up there and the weight is spread out nicely. Here are some more pics.

    Click image for larger version. 

Name:	FullSizeRender-4.jpg 
Views:	304 
Size:	87.7 KB 
ID:	10616Click image for larger version. 

Name:	FullSizeRender-6.jpg 
Views:	304 
Size:	63.5 KB 
ID:	10618Click image for larger version. 

Name:	FullSizeRender-5.jpg 
Views:	306 
Size:	147.1 KB 
ID:	10617

Posting Permissions

  • You may not post new threads
  • You may not post replies
  • You may not post attachments
  • You may not edit your posts
  •  
About us
Unparalleled product knowledge. Our mission is to support all original Land Rover models no longer supported by your local Land Rover franchise. We offer the entire range of Land Rover Genuine Parts direct from Land Rover UK, as well as publish North America's largest Land Rover publication, Rovers Magazine.
Join us