
 Tweet
Tweet
Ok I bought a truck that needed some love. One of it's issues was it wouldn't shift right (an auto). In particular would often not go into 4th. but some other odd stuff.
I found this website http://www.disgruntledgoat.com/conte...ar/ZF4HP22.php
and
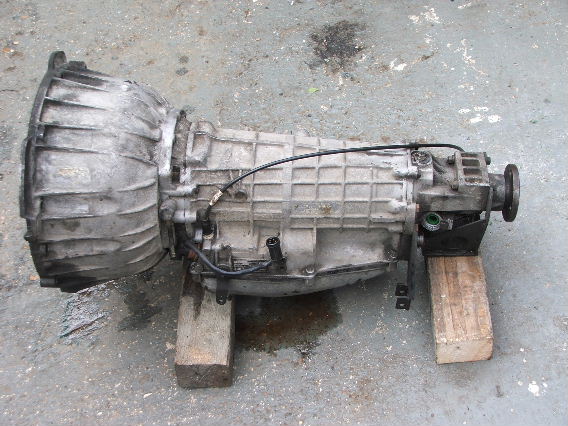
The land rover uses a zf4hp22 trans (at least in the 99 disco I). It all looked interesting and reasonable so I thought I'd try to rebuild my trans. I pulled the truck in the garage and started to tear it apart.
First thing I found was you must remove the sway bar (or at least the sway bar mounts) to get the Y-pipe out. no biggie. The next thing I found was disconnecting the O2 sensors was not logical. All other cars I have worked on are set up so the wiring is all in place and then plugged in when the item is installed in the car. On the o2 sensors the part that comes off....Say the Y pipe, has the connector that is snapped into the bracket on the trans. I may not be making sense but the short of it is. you need to unclip the O2 sensor from the clip securing it to the trans. it is WAY EASIER to unclip it first and then try to seperate the connector. I learned this after 2 connectors with alot of effort. The next 2 on top of the bell housing are impossible to see but with the new technique were manageable.
Let's see what else do I remember. Oh the transfer case is Extremely heavy. I mean really heavy. Oh and the torque converter is beastly heavy too. Here is something. There are 4 bolts holding the torque converter to the flex plate. Don't get distracted by the bolts that hold the ring gear to the flex plate....Who would do that . The 4 bolts for the torque converter are access through 4 holes in the flex plate at each bolt. easy to see if you are looking for it. Oh and there are 8 bolts holding the trans to the engine. Don't try to remove after only removing 6. It won't work I guarentee it
 Countem 8 bolts. If you don't have them all keep looking.
Oh contrary to the rave CD you can remove the e-brake cable any time you want. You don't have to have the trans dangling precariously to do it. The cable is detached from the inside just as the manual says. I recommend detaching it first so your not covered with oil and dirt.
I tore down the trans and put new clutch plates in it and many of the metal spacer plates that came with my trans kit. Unfortuately the kit I had some of the parts didn't match my trans oddly enough. The trans is a BMW made trans and the truck version must be slightly different or something. I think it was the C clutch frictions didn't fit and many of the metals were the wrong thickness (be sure to measure the old vs new). I don't remember too that was too unusual other than there are a LOT of parts in there. I decided to not rebuild the pistons for the clutches as I was confident they worked and disassembly and reassembly looked pretty risky. Oh and the rear trans seal for my kit didn't fit either as the rear cover of the trans is different on the landrover due to the 4wd.
Here's another thing I found before even removing the trans. The shift down cable had broken the casing right where it entered the trans. Looked like the plastic had gotten brittle and snapped. I have a picture of the new vs old. Another thing I found was at the tail end of the trans was some RUST on a few parts. Looks like the truck must have sat for a long while. So the 86,000 miles on it were probably for real but not necessarily helping it work better if it is rusting. (I'll add pics of that later). I cleaned up the govener which was sticky and had some rust scale on the few steel parts it had too. So the trans should be good to go again.
I decided that "while I was at it" I'd replace the rear seal, the oil pan gasket and the transfercase input seal. So I ordered the parts. I read the rave CD on how to replace the rear seal. Basically goes like this,
1. remove trans (already done)
2. Dissasemble the flex plate
3. Remove the flex plate
4. Remove the oil pan
5. Remove the 2 rear main bearing cap bolts.
6. remove main bearing cap
7. replace seals
8. reinstall everything.
LEt me tell you. do not do Step 2. Waste of time. The flex plate can be removed as an assembly. The 4 bolts holding the assy together are lock tighted together and do not need removed. Period. Remove the 6 SHCS on the inner most ring of bolts. Between step 5 and 6 is missing 2 steps. 5.1 Remove the starter. Step 5.2 remove the 2 CROSS BOLTS holding the main cap on. After quite a bit of time struggling with and tapping on the main bearing cap trying to get it out I gave up and sealed it back up wishing I'd never touched it as I knew it would leak worse now. Then I noticed the bolts on the side of the block that could only go to the bearing caps. UGH! Why read instructions anyway. I think I would have done better on the rear seal by just looking and removing what made sense.
Ok rear seal is back in I clean the oil pan mating surfaces and go to use the purchased oil pan gasket. There was only a silicone or RTV type seal in it when I took it apart. I lay the new gasket on it and it's not fitting. It's got the right shape and hole pattern but it's like it was the right size and then a big rolling pin rolled it and squeesed it to a bigger shape. In other words it needed reduced to about 95% of it's original size to work. So I toss that aside and grab a tube of RTV silicone. Waste of $10 for the pan gasket.
Oh here is another tip. The transfer case has a electronic lock out that default position is locked into one position. IN other words no amount of heaving on the High low range lever will make it shift without electrical power from the truck telling it that the auto trans is in neutral. Well now I know. The center diff lock is selectable and now is a good time to grease it all up and test that it operates smooth.
I don't know what else to say. It goes back in the truck like you would expect. Oh to hold the torque converter in the trans so it doesn't slip out of place while installing the trans I slipped a tie wrap through one of the holes in the torque converter to flex plate mounting surface and then tie wrapped to one of the 3 little bolts for the round bottom access cover. This worked like a charm. Even when one of my staps holding the trans slipped off and dropped it a few inches onto some wood I had stacked up. Which reminds me. When removing and installing I took to tie down straps (for holding stuff on trailers etc) and connected it to each side of the frame under the front and back of the transmission. I'd Tighten and loosen them as needed so that if anything happened the trans couldn't go far. I'd even let the front of the trans sit on the front one most of the time on the install. Just make sure the hooks are hooked good. Oh and that your not crushing any brake or fuel lines. No I didn't crush any. I don't mess everything up.
That's it for now. I'll add more later.
I found this website http://www.disgruntledgoat.com/conte...ar/ZF4HP22.php
and
The land rover uses a zf4hp22 trans (at least in the 99 disco I). It all looked interesting and reasonable so I thought I'd try to rebuild my trans. I pulled the truck in the garage and started to tear it apart.
First thing I found was you must remove the sway bar (or at least the sway bar mounts) to get the Y-pipe out. no biggie. The next thing I found was disconnecting the O2 sensors was not logical. All other cars I have worked on are set up so the wiring is all in place and then plugged in when the item is installed in the car. On the o2 sensors the part that comes off....Say the Y pipe, has the connector that is snapped into the bracket on the trans. I may not be making sense but the short of it is. you need to unclip the O2 sensor from the clip securing it to the trans. it is WAY EASIER to unclip it first and then try to seperate the connector. I learned this after 2 connectors with alot of effort. The next 2 on top of the bell housing are impossible to see but with the new technique were manageable.
Let's see what else do I remember. Oh the transfer case is Extremely heavy. I mean really heavy. Oh and the torque converter is beastly heavy too. Here is something. There are 4 bolts holding the torque converter to the flex plate. Don't get distracted by the bolts that hold the ring gear to the flex plate....Who would do that
. The 4 bolts for the torque converter are access through 4 holes in the flex plate at each bolt. easy to see if you are looking for it. Oh and there are 8 bolts holding the trans to the engine. Don't try to remove after only removing 6. It won't work I guarentee it Countem 8 bolts. If you don't have them all keep looking.Oh contrary to the rave CD you can remove the e-brake cable any time you want. You don't have to have the trans dangling precariously to do it. The cable is detached from the inside just as the manual says. I recommend detaching it first so your not covered with oil and dirt.
I tore down the trans and put new clutch plates in it and many of the metal spacer plates that came with my trans kit. Unfortuately the kit I had some of the parts didn't match my trans oddly enough. The trans is a BMW made trans and the truck version must be slightly different or something. I think it was the C clutch frictions didn't fit and many of the metals were the wrong thickness (be sure to measure the old vs new). I don't remember too that was too unusual other than there are a LOT of parts in there. I decided to not rebuild the pistons for the clutches as I was confident they worked and disassembly and reassembly looked pretty risky. Oh and the rear trans seal for my kit didn't fit either as the rear cover of the trans is different on the landrover due to the 4wd.
Here's another thing I found before even removing the trans. The shift down cable had broken the casing right where it entered the trans. Looked like the plastic had gotten brittle and snapped. I have a picture of the new vs old. Another thing I found was at the tail end of the trans was some RUST on a few parts. Looks like the truck must have sat for a long while. So the 86,000 miles on it were probably for real but not necessarily helping it work better if it is rusting. (I'll add pics of that later). I cleaned up the govener which was sticky and had some rust scale on the few steel parts it had too. So the trans should be good to go again.
I decided that "while I was at it" I'd replace the rear seal, the oil pan gasket and the transfercase input seal. So I ordered the parts. I read the rave CD on how to replace the rear seal. Basically goes like this,
1. remove trans (already done)
2. Dissasemble the flex plate
3. Remove the flex plate
4. Remove the oil pan
5. Remove the 2 rear main bearing cap bolts.
6. remove main bearing cap
7. replace seals
8. reinstall everything.
LEt me tell you. do not do Step 2. Waste of time. The flex plate can be removed as an assembly. The 4 bolts holding the assy together are lock tighted together and do not need removed. Period. Remove the 6 SHCS on the inner most ring of bolts. Between step 5 and 6 is missing 2 steps. 5.1 Remove the starter. Step 5.2 remove the 2 CROSS BOLTS holding the main cap on. After quite a bit of time struggling with and tapping on the main bearing cap trying to get it out I gave up and sealed it back up wishing I'd never touched it as I knew it would leak worse now. Then I noticed the bolts on the side of the block that could only go to the bearing caps. UGH! Why read instructions anyway. I think I would have done better on the rear seal by just looking and removing what made sense.
Ok rear seal is back in I clean the oil pan mating surfaces and go to use the purchased oil pan gasket. There was only a silicone or RTV type seal in it when I took it apart. I lay the new gasket on it and it's not fitting. It's got the right shape and hole pattern but it's like it was the right size and then a big rolling pin rolled it and squeesed it to a bigger shape. In other words it needed reduced to about 95% of it's original size to work. So I toss that aside and grab a tube of RTV silicone. Waste of $10 for the pan gasket.
Oh here is another tip. The transfer case has a electronic lock out that default position is locked into one position. IN other words no amount of heaving on the High low range lever will make it shift without electrical power from the truck telling it that the auto trans is in neutral.
Well now I know. The center diff lock is selectable and now is a good time to grease it all up and test that it operates smooth.I don't know what else to say. It goes back in the truck like you would expect. Oh to hold the torque converter in the trans so it doesn't slip out of place while installing the trans I slipped a tie wrap through one of the holes in the torque converter to flex plate mounting surface and then tie wrapped to one of the 3 little bolts for the round bottom access cover. This worked like a charm. Even when one of my staps holding the trans slipped off and dropped it a few inches onto some wood I had stacked up. Which reminds me. When removing and installing I took to tie down straps (for holding stuff on trailers etc) and connected it to each side of the frame under the front and back of the transmission. I'd Tighten and loosen them as needed so that if anything happened the trans couldn't go far. I'd even let the front of the trans sit on the front one most of the time on the install. Just make sure the hooks are hooked good. Oh and that your not crushing any brake or fuel lines. No I didn't crush any. I don't mess everything up.
That's it for now. I'll add more later.

 .
.
Comment