Wiring harness vs doing it yourself

Collapse
X
 
  • Time
  • Show
Clear All
new posts
  • bensdad
    Low Range
    • Mar 2014
    • 77

    Wiring harness vs doing it yourself

    About the last thing left (knock on wood) on my 60 S2 is to redo the old wiring. It is pretty much a mess at this point. I guess you could follow the wiring diagrams and take pics of the old wiring for reference, but how do I know what guage wire to use where and is it possible? Any of you have suggestions or should I just attempt to install a new wiring harness?
    Thanks gang!!
  • TeriAnn
    Overdrive
    • Nov 2006
    • 1087

    #2
    Replacement wire harnesses are a good quick way to go IF you have a stock or near stock electrical system. You can even order a harness wired for a Delco 3 wire alternator.


    The more you deviate from a stock you electrical system is the more you need to cut the harness and route new wires. You could end up with a with a patched up harness that has lots of splices and unused wires.

    If you know how to read a wiring diagram and how to wire things and you have a non stock electrical system you can try doing it yourself.

    If you decide to do it yourself you will need a supply of British standard wiring code coloured wires, a list of what colour wire gets used for what application and a proper crimp tool. Those cheapo crimp, wire strip and screw cutter tools will not make a proper crimp and the ends will easily fall out of the semi crimped connectors. If you are not willing to pony up for a proper crimping tool don't bother trying to build a custom harness. You will also want the tool for pushing the bullets into the barrel housings. They are a very tight fit when new.

    Building a harness is simple if you build it one circuit at a time. For instance: Big ground wire Battery to frame. Ground strap, frame to bolt holding on starter motor. Big red wire battery to starter switch and another from the starter switch to the starter motor. Now the engine can turn over.

    Big brown wire from the side of the starter switch connected to the battery to the fuse box. Brown wire going from the other side of the fuse to the A terminal of your combination ignition headlamp switch. A white wire from the switch Ign connector to one side of the ignition coil. A white with black stripe wire going from the other side of the coil to the connector on the side of the distributor and you have spark. You can start the engine and have it run.

    A big blue wire from the H terminal of the switch to the dip switch. A big blue white wire from one side of the dip switch to the headlamp socket plus a black wire from the headlamp witch to chassis ground and you have high beam headlamps. Run a big blue with red stripe wire from the other side of the dip switch to the headlamp connector and you have dimable headlamps.

    You just build the harness up one circuit at a time and test each circuit as you build the harness. Route each new wire the same as the previous wire to build a harness. Use the occasional zip tie to keep the wires together as you build the harness. And you always use a rubber grommet then a wire passes through a hole in sheet metal.

    It is easy IF you understand electrical circuits, how electricity flows and can read a circuit diagram. If electricity is kind of a mystery to you and you don't fully understand what a circuit is doing when you look at a schematic, buy a premade harness and keep the wiring stock.

    If you are going to do it, do it right with the correct crimper, correctly coloured wires and the British Standards Institution BS-AU7 wire colour code chart.
    -

    Teriann Wakeman_________
    Flagstaff, AZ.


    1960 Land Rover Dormobile, owned since 1978

    My Land Rover web site

    Comment

    • siii8873
      Overdrive
      • Jul 2007
      • 1011

      #3
      I removed my old harness, stripped all the tape, replaced and damaged wires, added some new circuits , and repaired/replaced terminations as needed and re taped it. Made sure I marked / kept track of where the circuits entered / exited the main harness.
      This depends on the condition of your existing harness. Could just use it for a model if in very poor shape.
      For parts britishwiring.com has all wire, fuse boxes, fittings and tape.
      This site also has a reference for recommended wire sizes for all the devices being fed.
      THING 1 - 1973 88 SIII - SOLD
      THING 2 -1974 88 SIII Daily Driver - SOLD
      THING 3 - 1969 88 SIIA Bugeye Project
      THING 4 - 1971 109 SIIA ExMod - SOLD
      THING 5 - 1958 109 PU
      THING 6 - 1954 86" HT

      Comment

      • kb1iaw
        Low Range
        • Mar 2015
        • 13

        #4
        Very good advice from Teriann. I did nearly everything she recommends when I built my own harness . Drawing on what I learned from rewiring my sailboat it was a fairly simple process. I printed out a the original wiring diagram which is taped to the windshield then redrew portions of the diagram to accommodate a fuse for each circuit. That's the diagram taped to the foot well. Upgrading to a Delco alternator and a modern starter freed up a lot of real estate on the bulkhead. It eliminated the need for a stand alone solenoid and voltage regulator leaving room for a larger fuse block. The local source in Portland, Maine supplies many marine related businesses so he only stocks marine grade (tinned) wire which I believe is well worth the additional expense. Here are a couple photos, one partway in to the process and the second when it was nearly complete.
        Attached Files

        Comment

        • triumphtr7guy
          Low Range
          • Jan 2011
          • 66

          #5
          Bensdad, seeing how you say the original harness is a mess, and it is 55 years old, you may want to go with a new harness. Anything is buildable, nothing is impossible, so you can make a new harness yourself, the biggest problem is finding the color coded wire to match the original, so as to coordinate with the wiring diagram, or making your own wiring diagram with color codes as you built.The aggrevation comes in when someone else goes to work on it and has to interpolate your color codes to the original diagram.
          If you have the Landy in pieces, then snaking a new harness through is easy, if not , then it isnt impossible, just having to take stuff off to fish the harness through can be time consuming. And since the wiring is 55 years old and if you plan on keeping the Landy for a while, you can remove a plethora of plagues that will haunt you from the old wiring. wonderful thing about wires corroding inside the insulation, you cant see it!!! and gives wonderful intermittent failures. had that happen with a 91 Ford explorer I had, lead for the starter went from the relay down under the bellhousing and then up to the starter, low point!!! what a joy that was. and sure enough when got it all figured out, cut the wire, nothing but green dust in there. Made up my own lead, and went around that problem. So my vote is, new harness Good luck

          Comment

          • o2batsea
            Overdrive
            • Oct 2006
            • 1199

            #6
            Bullet crimp tool: $60
            Wire stripper: $30
            Spade terminal tool: $55
            Bullets (about 100) $30
            Spade terminals, various $15
            Connector sleeves, double, single about 80 or so $65
            Wire, various lengths of braided cloth covered ~$120
            Labor?

            OK you are now over what it costs to buy the harness.

            Comment

            • bensdad
              Low Range
              • Mar 2014
              • 77

              #7
              Thanks for all of the great advice. Sounds like a new harness is a good idea. If I had more electrical skills I might go it alone.

              Comment

              • triumphtr7guy
                Low Range
                • Jan 2011
                • 66

                #8
                making one is a lot of time and effort, fall back on the old adage, "you want to be driving it or working on it?? "
                Happy motoring

                Bruce

                Comment

                • bensdad
                  Low Range
                  • Mar 2014
                  • 77

                  #9
                  Funny how true that is. I have driven it around the neighborhood without seats, seat belts, lights and even brakes. I just want to drive it like a normal vehicle. Thanks everyone for the help.

                  Comment

                  • cedryck
                    5th Gear
                    • Sep 2010
                    • 836

                    #10
                    If you want to buy then our hosts have everything you need, The wiring diagram in the green book, or from our hosts is all you need that and the ability to test with a continuity tester. There is nothing like the piece of mind that a new wiring harness brings,
                    Last edited by cedryck; 03-30-2015, 01:22 PM.

                    Comment

                    • TravelinLight
                      Low Range
                      • Jan 2015
                      • 51

                      #11
                      painless wiring harness is also an option. You could get a couple of more circuits and newer fuse panel.
                      Sean
                      1971 Series IIA Dormobile

                      Comment

                      • TeriAnn
                        Overdrive
                        • Nov 2006
                        • 1087

                        #12
                        Originally posted by cedryck
                        If you want to buy then our hosts have everything you need, The wiring diagram in the green book, or from our hosts is all you need that and the ability to test with a continuity tester. There is nothing like the piece of mind that a new wiring harness brings,
                        The wiring diagrams in the work shop manual are a sampling of circuits for different year vehicles built to different country specifications for different models. If you want the correct wiring diagram for your vehicle look in the owner's manual. Unlike most owners manual the Series manual is actually useful with the correct wiring diagram, step by step tune up how-to instructions and a maintenance schedule chart.

                        When I was new to my 1960 109 having the owner's manual was a big plus. It was also very interesting to read about the available options. I had no idea that an alternator was a factory option in 1960.

                        wire colour code chart

                        Fuse equivalent chart, US vs UK fuses

                        Early headlamp /ignition switch connections
                        -

                        Teriann Wakeman_________
                        Flagstaff, AZ.


                        1960 Land Rover Dormobile, owned since 1978

                        My Land Rover web site

                        Comment

                        • Partsman
                          3rd Gear
                          • May 2011
                          • 329

                          #13
                          Listen to Terriann and O2batsea when it comes to cost and how to do it. I'm currently building a new wiring harness for my daily driver, but the way I'm doing it, is I measured the truck up, and mocked the engine compartment and dash area up with peg board, the type you hang your tools on. I'm going by the diagrams in the book, and referring back to my truck for anything that doesn't seem to match up. One thing that I'll mention getting that no-one else mentioned yet are heat shrink connectors, these are great as they also give you weather proof connections on your wire ends. When I'm done, I'll have a wire harness that matches the British standard color codes that can just be dropped it, with a new multicircuit fuse box and relays for the headlights. As for the gauge and sizes of the wires, I believe Terriann has that in her website if I'm not mistaken.
                          Harvey


                          Series 2 Club Forum


                          Andy The Landy Shop

                          Comment

                          • 64Blue
                            Low Range
                            • Sep 2007
                            • 64

                            #14
                            This is quite an old thread to resurrect, but I wanted to ask a few quick questions on this. Got the harness from the host for a '64 '88 positive earth converted to an alternator configuration.

                            Main harness is relatively easy.

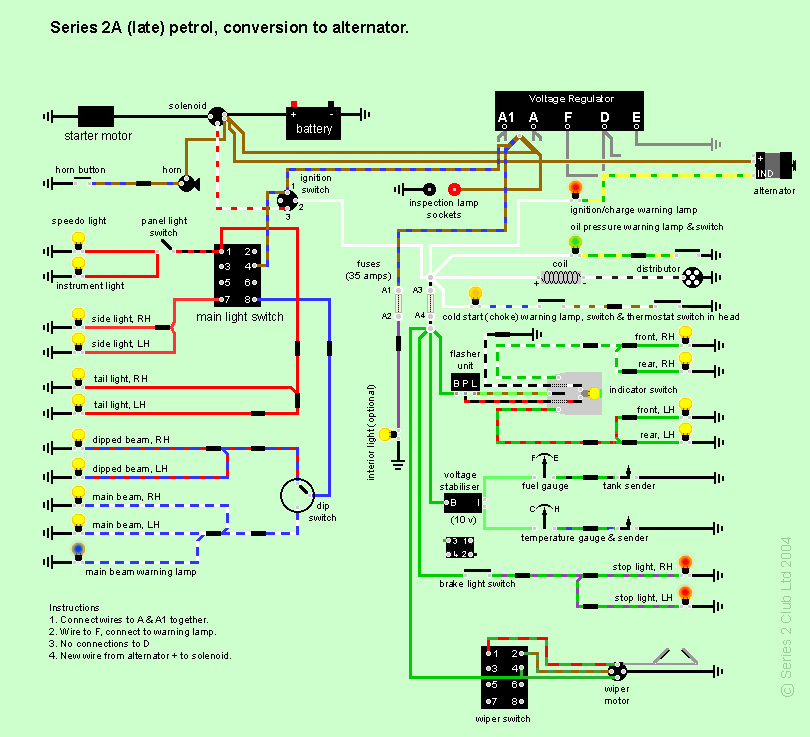
                            can anyone point me in the direction of a diagram with the alternator conversion. I have the green bible in triplicate, but can't seem to find that specific config.

                            Heres as more detail ( having a hard time orienting the main secondary harness. On one end it has large two female spade clips on heavy brown wires (ammeter? So in the cab?) and a yellow with a spade clip. Shortly after that branch out to a green solid with a female spade.
                            I guess a better way of asking the question is does anyone have a wire harness that goes around the front of the engine? I can't seem to figure out how it lays out and stays on the back by the fire wall. Thanks in advance. I know this is a horribly asked question.)

                            thanks!

                            Comment

                            • Partsman
                              3rd Gear
                              • May 2011
                              • 329

                              #15
                              Well I can help with the diagram for the alternator conversion, all the diagrams you could need are here:


                              Series 2 Club Forum


                              Andy The Landy Shop

                              Comment

                              Working...