PDA

View Full Version : Looking for a Series 3 gearbox, LT76, preferably a later one


vlad_d
04-05-2022, 05:07 PM
Okay, I'm trying something out.

Folks here have been telling me I need to put the feelers out to find a good deal. So, here goes...

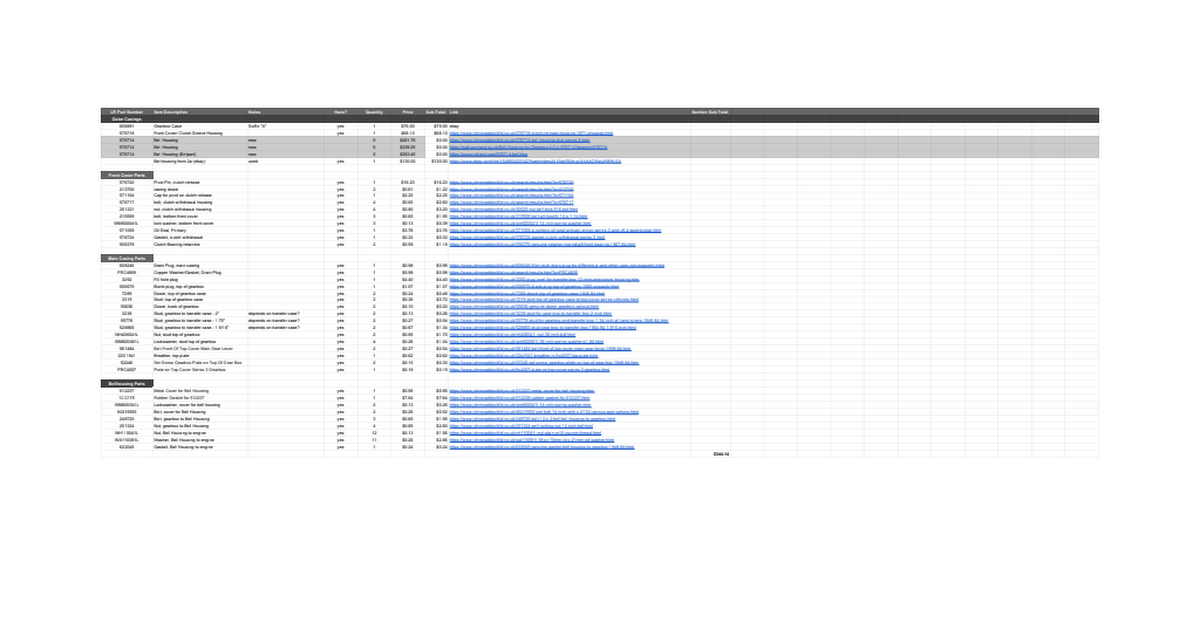
My next project is a gearbox. I've got no one local who can do it...they all send it out, anyway. So, I'm in the market for a Series 3 gearbox. I want a standard LT76, preferably a later (suffix "D"?) as I've been reading these are more robust. But honestly, I just want "of equal or better quality" as I've got. I don't need a tank gearbox...and I'm not cutting up and re-welding to shoehorn in a later gearbox. Just stock part swapping.

It needs to be 100% rebuilt, and under the $3700 our hosts are asking. I don't need a lifetime warranty. But I'm not spending $2k-$4k and a month later I get weird noises or grinding. It needs to be professionally built, with proper endplay, etc. No backyard mechanic. I want it from a reputable shop.

Any leads would be much appreciated.

jimrr
04-18-2022, 09:31 PM
it's been 13 days for you and no responses so I thought I'd tell you I know where a bunch of landrover parts are buried in a canyon just across the border in Idaho. The young person who owned all this was killed in a rock climbing accident when he was about 20 years old and the distressed family buried a lot of his stuff. parts, pto, xmissions etc. , one day I hope to pursue this story.

vlad_d
04-22-2022, 12:45 AM
Thanks @JimR. I'm not quite ready to go digging up buried treasure ;P

Wow, been doing some reconnaissance. John Craddock was asking about 1800GBP(about $2300), which sounded like a good deal. But I emailed them and they had a supplier that no longer does it. So they can't sell me one. Their website still has the item, but they're not filling orders.

Our hosts send out to a supplier in the UK. There is a waiting list about 6 people long, and the lead time is about 4 months.

A local LR 4x4 shop is willing to do it for $180 hour...but it's like indefinite time. That's going to add up, quick.

So, I looked on ebay and found a local guy selling a gearbox case (suffix A, turns out mine is a suffix A, too)for $70 in good condition. All the bits are still available for sale. So, I guess I'm going to build a new one myself. I'm picking the gearbox case (suffix A) tomorrow.

My plan is to take my time and build it on the bench, in no hurry. My current gearbox still works, and is drivable. I'm hoping to build out the new one, and then just spend a weekend doing the swap...to minimize down time. Thing I was affraid of was pulling the old gearbox and laying up the Series in the front yard indefinitely. Maybe I'll take some pics along the way and post here. I can't tell if people enjoy that or hate it. But maybe it helps someone landing on this thread in the future. Wish me luck!

jimrr
04-23-2022, 12:03 PM
i have been thru mine two or 3 times. syncros never seem to last!! I guess there are land rover bone yards far off the beaten path in africa with valuable parts and options there. no doubt salvaged a lot but ............. one would have to go there and spend a few months filling shipping containers !!

vlad_d
04-27-2022, 12:35 PM
Seems alot of the parts are still available, with some exception. The main casing being one of them. Since I'm building one from scratch, I'll use this post to keep updated about parts availability and the build(not really a rebuild anymore).

Week#1:
I picked up the casing from about 1.5 hours away. It's an "A" suffix gearbox casing. It was a bit grimy, so I used a wire brush and then SimpleGreen and hot water to clean it up. Pics attached. It came out pretty clean. I don't have a parts washer, so I'll probably do this for the other old parts.
1394113942139431394413945

Gearbox Suffixes:
So, I'll need to buy or source parts for this new gearbox. They made changes over the years...so getting the right parts will be key. I'm learning as I go, so I thought I'd share the process. Maybe you know this stuff, maybe not...maybe it's fun just to go through it with me. Turns out, there are 4 "Suffixes" letters stamped on the outside of the box to identify it: A, B, C, D. The LT76 stands for "Leyland Transmission" and 76 is the distance between the two geared shafts (on center). So, right off the bat...lots of interchange possible. I think the tricky bit is identifying your innards, because some Searies 2,2a boxes didn't have synchros on 1st + 2nd and later suffixes used different gears plated specially that can't be used with earlier parts. But I'm sourcing all new parts, so I'll try to pick the right ones.

Finding the serial number and Suffix:
There are lots of numbers and letters stamped on the gearbox. But the ones you're looking for are on the top, back-right...on the removable housing that holds the shifter shafts. This is not to be confused with the big "A" on the right side, next to the Leyland logo. Also, the whole assembly of 1)gearbox, 2)transfer case and 3)output are three parts with their own serial numbers. You want just the gearbox. See pics.The Suffix is the letter just above the serial number. Luckily, you can just see it with the center seat/cubby panel removed.

Decoding the Serial number and Suffix
I scanned in a page from James Taylor's book, about gearboxes. This is a great resource for numbers and specs.See pics.

The "new" gearbox housing I have is a basic Suffix "A". Great!

As a fun fact, I looked up the one in the truck. Turns out it's a Suffix "B" and the 951 serial number shows it came out of a Military/Lightweight Land Rover. Hmm. Two things about that:

1) There are other signs my frame and differential are off an Ex-MOD Landy. The Salsbury rear diff has white "convoy" paint on the back cover. And the bumpers have J.A.T.E. shackle mounts on them. The gearbox is another nail in the coffin. I think someone replaced the rolling chassis on my S3. Also, the front-right spring hanger (the one with the VIN) was swapped...likey to register it under the same VIN.Hmm. Well, I'm all legally registered and papered, so I won't worry about it. But fun car history. I'm sure each Landy has a story or two.

2) The second result of this is that I might not have been ordering the right parts if I just assumed it was original. I have the parts book, and using part numbers from there. I might have assumed 1973, when that gearbox came out in 1977. So, I guess the moral is, check serial numbers, because previous owners swap stuff all the time.

It turns out the Suffix "A" box is more accurate for my year. But I had a mini mental crisis about what to do with the existing Suffix "B" in my car? It's actually the better gearbox. Looking into it, I guess the only difference is a stronger Reverse. I guess they improved the design on the Suffix "B" to better engage reverse. Since most people have their hand on the stick as they reverse, I'm not worried about it popping out. Let me know if any of you guys experience this with a working Suffix "A" LT76.

So, I'll finish the Suffix A build and swap them...maybe rebuild the Suffix B later and keep it or sell it. A used gearbox seems to be worth $100 core, and $3600 rebuilt. So, I'll not let it go without a profit. The math is just weird.

So, I ordered the first bit of parts - for the exterior. Bell Housing, front cover, seals and bolts. All of which are still available new. Part numbers and links in this spreadsheet:

https://docs.google.com/spreadsheets/d/13FmnoIo10uMIkS4IwnY6APv2wqMbJN3mUgVcGm0W1q8/edit?usp=drivesdk

roverp480
04-27-2022, 02:06 PM
Looks to be an interesting project. I am not sure if I a reading your spreadsheet correctly, but are you planning to use a 2A bell housing, as it isn't suitable for the S3 clutch release mechanism. the two are significantly different ? S2A suffix B onwards is 556044 and S3 is 576714

vlad_d
05-01-2022, 02:38 AM
Advice and ideas like this are great. Keep them coming. I'd love to find out stuff sooner rather than later. Thanks @Rover480.

So, since last week I got the Bell Housing in the mail. I ordered one off ebay because it was about $130 cheaper than the new one(plus shipping was cheap, only shipping from SoCal). It arrived and I used some paint thinner and a wire brush to clean it up, again. Then dry fit to the gearbox to confirm. To be honest, it was a gamble, because it didn't have a Land Rover part number. I had to use photos of it and guess. But I lucked out and it fits great.

I have the S3 Parts Manual, and here's the page from the gearbox section.(See attached) . Looks like you are correct, the one for the S3 is 576714. I also attached a pic of the bell Housing for comparison. It looks identical, except for an access hole on the left side of this view. Bolt holes seem to line up with the gearbox case. I haven't received the front cover yet. I'm hoping that matches, and I think it will because they will be part # matched for S3.

To be honest, I don't really know if the gearbox case is from a 2a. I have the part number and Suffix. That tells me it's an LT76 suffix "A", but not what it came out of. The guy I bought it off had a nice Dormobile 2a out front and he said the gearbox came from a 2a. But, you know, he could have had the same thought going on as me and my S3: some prior owner swapping out parts. So, I can't confirm if it came from a 2a. Anyone else can from the serial number?

Luckily, it seems to bolt all together. So the build is still on(whew!).

vlad_d
05-01-2022, 02:54 AM
I had a though that I can't quite shake. Maybe someone on the forum can answer this one:

Seems the gearbox Suffixes tell you about the innards. I imagine no one is getting out detailed blueprints to identify the reverse mechanism from a Suffix A from the one in Suffix B. Or, no one is trying to mix and match plated gears from a Siffix D with non-plated Suffix A/B/C. So, the Suffix tells you what's inside....but the spacing of the bearing journals on the case is the same? So, to my thinking, if you wanted to put 100% Suffix D parts into a Suffix A case...it would work? Can anyone confirm this thought experiment?

I mean, it would screw over the next guy trying to identify the parts. But, if I'm buying 100% new parts in there...why not benefit from the latest design fixes over the years and get a stronger overall gearbox? Would that be unethical? I could put a metal tag on the gearbox with notes or something. As opposed to just putting in the inferior reverse gear just because it matches the "A" stamp on the outside of the case?

What do you folks think?

roverp480
05-01-2022, 03:01 AM
I havnt any parts in front of me but the series 3 bell housing has an extra aperture for the clutch release lever and attaching the hydraulic slave cylinder . See attached picture I lifted off Ebay
13949
Regarding your question regarding reverse gear etc. and Suffix letters. A number of the parts are not interchangeable between suffixes. but some are. I don't have any info as to which parts can go together. Theoretically if the casing part number stays the same one should be able to fit any set of matched parts inside . I say theoretically , having worked for Land Rover, as I have come across parts that haven't followed the part numbering system correctly. Personally I would go for getting all the correct parts for the suffix letter on your main casing .

vlad_d
05-02-2022, 07:24 PM
I will have to check what's on my truck now. The plot thickens...

Also. I don't know why am I so excited by a pic of a rusty transmission on a pallet in the woods ..but I am. Its a disease...

vlad_d
05-07-2022, 04:15 PM
Week #3 [ Update ]
So I got my first round of parts for the outer gearbox in. Looks like they all fit. In classic Land Rover fashion, everything just takes 2 weeks to get to me by mail. But, the good news is most of these parts are still available new, with the exception of the gearbox casing. FYI.

This week, I went diving into the parts manual to look at what parts I need, and if I can benefit from any "upgrades" over the years. My thinking is : if I have to buy 100% new parts (I'm building a gearbox from scratch) then I don't have to worry about re-use. I can get whatever is needed to upgrade to the better part. I found some interesting stuff below...

Suffix part interchange - Layshaft
I've attached the pages from the Series 3 Official Parts Catalog on the Layshaft, for reference.
13959

I'd seen in James Taylor's book above a mention that between the Suffix "A" and "B" Land Rover had beefed up the Reverse gear mechanism. Looking through the parts catalog, it shows 2 diagrams...but keen eyed readers will see that most of the part numbers are the same. So, that tells me that the only change in the Layshaft assemblies is the Reverse shaft. Looking at the next page, there is a "Reverse Modification Kit" that seems to fix the Suffix "A" issues, and upgrade the weakness. The difference in parts comes down to they replaced a brass bush with a bearing. This made for a new reverse shaft and the reverse gear(where the bearing/bush fits into). Looks like the "Kit" just gives you the "B" shaft and reverse gear. The layshafts also are matched...so if you want the upgrade you need the "B" layshaft. All the bits in front of the layshaft are interchangeable between A + B. And the back bearing is the same. So, that tells me that the Layshafts are interchangeable in the case (A & B). So I'm going to order the "B" Layshaft and Reverse shaft, and basically have a "Reverse Modified Kit Suffix A"...or essentially a Suffix B innards. Seems that C kits are the same in this respect (the Layshaft), so this info applies to them, too. Only when you get to "D" suffixes do you get different part numbers, and I suspect that's more to do with the electroplating on the gear surfaces than dimensional differences.

I made up a parts order, and added it to the spreadsheet, here:
https://docs.google.com/spreadsheets/d/13FmnoIo10uMIkS4IwnY6APv2wqMbJN3mUgVcGm0W1q8/edit?usp=sharing

I'll let you al know how it goes, and appreciate any insights I missed.

vlad_d
05-18-2022, 02:03 AM
Week 4(?)
I'm loosing track of time as I'm mostly just waiting for parts and paychecks to buy said parts. I DID get to do a bit more research and order most of the internals this week. I've updated the spreadsheet link above to include all Mainshaft components and gearing.

Mainshaft interchange
The manual shows interchange for A+B+C Suffixes for these components. So it was easy to order the right parts. Honestly, I don't know what the difference between a "B" and "C" Suffix LT76. On paper, they look to have the same parts. I'm building a "B" internals in an "A" case.

1 Ton
There are a few parts at the back of the Mainshaft that differ in the "109 1 ton", which threw me for a loop. I thought maybe I wanted a 1 ton gearbox internals thinking they might be "heavy duty"(Good!). Which is misleading. After some research, it turns out the gearing is lower on 1st gear in the 1 Ton(military vehicle). Some folks saying that if you fit the 1 Ton gears, you can't benefit from an overdrive, later. Well, that's an upgrade I hope to make, so I went with the standard LT76 parts. So, that's what's listed in the spreadsheet.

I ordered everything Monday, so now I wait. The only thing not available was one distance piece in an odd size. I guess there is exact endplay that is achieved by putting in the correct size distance piece and measuring with a dial Guage when fully assembled. If it's not in range, you take it apart and put the corresponding distance piece in(larger or smaller). Well, I can't find the middle one available anymore. But I've seen people just use a larger one and rub it on a flat surface with sandpaper to remove a few 0.001". So that's what I'll do. We'll see.

I'll post some pics when all the parts come in and I do some final assembly. All-in-all, I've spent about $2200 so far on all new parts. The original quote was for $3600 for a "rebuild"(who knows what parts re-used?). So, not cheap, but still cheaper than buying from someone already done, by about 30%.

roverp480
05-19-2022, 02:59 AM
I am glad you didn't go with the 1 Ton parts as the mainshaft is different, to fit onto a modified transfer set of gears and they are not interchangeable . The 1 ton and Forward Control transfer box has dog clutches on both High & Low gears making it easier to engage low range on the move & it is sometimes refereed to as the "Easy Change" transfer . The standard box has dog clutch on high range but low is engaged by actually moving the gears into mesh. often referred as a crash change . The gear on the mainshaft sticks out further into the transfer box and thus an Overdrive will not fit as you have already ascertained.
I fell into this trap when I purchased a centre power take off for my 88" S2A and it didn't fit as it was off a 1 Ton.

vlad_d
06-12-2022, 04:35 PM
It's been a couple weeks since an update, so I thought I'd post:

Week 6(?) Update:
My parts supplier emailed me two weeks ago to say some parts were on back-order. It was the synchos I ordered. I ordered Genuine Land Rover synchros. A bit more expensive, but I wanted Genuine for Two reasons:

1) I saw a Britanica Restorations video on YouTube where the guy showed he got some aftermarket synchro and the teeth were machined wrong. I'm not inclined to deal with that nonsense, so I paid the extra for "Genuine" Land Rover synchros.

2) My 3rd/4rth gears grind getting in. It's the whole reason I'm rebuilding this gearbox(at great expense in time and money). So...the hell am I going to get a cheap synchro again?

Anyways. A word of caution, the synchros seem to be kinda rare. Or, at least they don't keep them 'in stock' and usually drop ship them from Land Rover. So, beware of unexpected delays.

So, I'm shuffling around the garage waiting for parts for another week...

vlad_d
07-11-2022, 07:41 PM
Week ~10 Update:

It's been a while since I updated here, but the gearbox build is still going. I've had some setbacks that required me to source additional parts. Details below:

1st & 2nd gears and Genuine 3rd Synchroniser.
After waiting 3 weeks for back-ordered parts from John Craddock, they inform me they just can't get my synchronizer in. They offered me a Baremach one. and I just don't trust them. Had one too many poorly machined parts from them. They offer to put an order in for me, but I declined. Speaking to Trevor over at RovahFarm and he tells me that he can order me one and that they are mostly being built out of Italy these days. I get nervous, having waited 3 weeks already for a part that a website said was in stock. I just don't want to risk drop shipment anymore. You either have it or you don't have it. No more of this "I can get it in 2 weeks" BS...So I found a supplier in Milan named 'Sivar' that makes the Synchro unit. Direct purchase through their eBay store and it came in 3 days. Wonderful! I don't know why I wasted 3 weeks with backorder.

Bell Housing and Clutch Release Mechanism
This one is a doozey. So, when I started this gearbox build, I sourced a bellhousing from ebay. Remember, I have a Series 3 with a 2.25 Petrol motor. So, I asked the guy selling the bell Housing if it will fit my engine, gearbox case, etc. The answer was yes. It DOES bolt on to both the engine and casting. BUT, it has an extra hole in the side of the belhousing. I didn't realise the implications of this. Basically, this is a 2a bellhousing. The clutch release mechanism is an older style mini-gear that pushes the clutch out when you twist a shaft that sticks out that hole in the bellhousing. Its a hold-over from the Series 1 that was a direct mechanical pedal that spun that shaft. Here are comparisson pics:

2a style:
https://littlegreenlandy.com/2019/08/10/gearbox-repair-6-clutch-release-mechanism/

Series 3 style
https://www.lrworkshop.com/diagrams/land-rover-series-3-clutch-and-flywheel/clutch-and-flywheel/clutch-clutch-release-mechanism-except-109in-v8_133

So, the difference becomes...I have to replace the whole clutch release mechanism, too. If I want to use this bellhousing. That's fine, I would have probably replaced those components anyway. But the issue is that I can't find the 2a parts! I don't have the 2a parts catalog, and searching for complete assemblies is near impossible without part numbers. I'm not even sure they sell/make new 2a clutch release mechanisms. At least, I can't find them. So, it comes down to this:

I can source all new Series 3 parts-they still make them(all the clutch parts). So, I'll get a new s3 Bellhousing. It sucks because I have a perfectly good Series 2a bellhousing I can't use. So, that's the thing to check before trying to mix-and-match 2a-3 parts. P/M me if you need a 2a bellhousing, I have a spare!

Everything else came in and looks good. Lots of little parts! Hope to get back to assembly when the new bellhousing comes in. I'll be sure to post pics of the new parts assembly.

roverp480
07-12-2022, 02:30 AM
Depending on which release mechanism you end up using, remember to get the correct clutch as although the 9.5 inch friction plate is the same on a late 2A and S3, the cover is different to match the two release mechanisms. On a S3 the release bearing presses directly on the Diaphragm spring fingers. On a 2A the is a thrust plate attached to the end of the fingers.

vlad_d
08-12-2022, 10:55 PM
Week 11 update:

Bellhousings issue resolved:
I received my Series 3 bell Housing. This is the one with the clutch release mechanism that is the hydraulic kind. I'll try attaching a picture comparing the two, in case anyone's interested. The one on the left is the S3. Notice it has two pop outs (one for starter motor, one for the hydraulic clutch piston). The S2 one is on the right. Notice it has only 1 pop out(starter motor) and a big hole in the side for the lever-driven clutch mechanism. Now you can tell them apart(and I can, too). I'll probably be selling the S2 one on ebay soon. PM me if anyone wants it. I have to admit that @Rover480 was trying to tell me this in the beginning of the post. I thank you. You were right.
14059

Reverse Gear and Reverse Shaft
This one is another suble difference between the Suffix "A" gearbox and all the others. I should have suspected this, because it was a different part number in the parts catalog. The parts catalog shows nice drawings, but they look identical as drawings. It's only when you look at the parts in-hand and try to assemble that you realize some dimensions differences. The Suffix "A" gearbox case has a slightly smaller diameter hole for the Reverse gear shaft. The Suffix "B/C" Reverse shafts, which are better, are larger diameter. I ordered the Suffix "A" Reverse shaft with the "upgrade mod" Reverse Gear (FRC1893). It came a few days ago and I compared the two. I'll try to post some pics. They seem the same length, the gears are the same width and teeth the same, etc. I got a machinist caliper on them to be sure. The improved B/C+ Reverse has a thicker shaft and roller bearing setup, which is smooth as butter. The Suffix A setup, even with the upgrade mod, is just a bronze slip collar. The Reverse Gear just rides on a thin film of oil, and wears that bronze bush. I had thought of maybe swapping the roller bearing setup onto the older shaft...but they are different diameters. The other thought was to machine the B/C Reverse Shaft end smaller, to fit the Suffix A case. But, the other end was also different diameter. In the end, I'm just going to install the Suffix A Reverse shaft with the mod upgrade gear. It looks to have an oil hole and criss-cross oil channels cut into the bush...so maybe it will stay lubed. Plus, you don't spend much time in Reverse, so maybe it's not an issue compared to the life of other gears. Maybe by the time your bronze synchros wears out, Reverse is still going. These are $30 parts, so sorting this out now is key. Don't mind getting both and comparing.
14060
14061

Going to assemble more this weekend.

vlad_d
08-15-2022, 07:20 PM
Week 11.5 update[\B]

[B]Finally building up the gearbox
Alright! With all the parts mostly in, I could finally start with some assembly. I have to say that the YouTube series by SteamWally is amazing. I was able to start putting these things together. I got all the bearings pressed into the Bell Housing, and retained with their various retaining clips, etc. Then drove the Primary Pinion into the Bell Housing. A brass hammer and a cheap bearing race and seal setting tool worked wonders.
14075

On to the MainShaft! The Parts Catalog shows a dizzying array of parts on it - broken up into two parts (front and back). In practice, it's less parts than it seems. The back half is partially in the case. The Rear Bearing and Oil Seal are kind of held together in this unit, with giant C Clips. A Harbor Freight moved in about 2 miles from my house, and I got a cheap FULL set of interior/exterior C Clip pliers. I can't stress enough how good an investment this was. About $30 and getting these monster C Clips on was no sweat. This unit then gets pressed into the rear of the case. The manual calls for Loctite 601. Well, good luck finding it, because they don't make it anymore. Loctite 603 is what I used. I think it supersedes it. Again, a brass hammer, gently using brass punches, in alternating strikes drove it home.
14076
14077

Here's a look at me trying to put a large diameter reverse shaft into a smaller diameter hole. You can see why it didn't work:
14078
But, using the correct one for my "Suffix A" case (described below in thead) worked fine. You just drive the reverse shaft through, then put the gear on, and drive it the rest of the way into the loop inside that holds the other end. The shaft is driven flush with the back of the case, and the pin holds it from spinning.
14079

I put the Layshaft in to check end-float. Here's a pic of how it aligns with the Pinion, which sticks out of the front of the Bell Housing:
14080
You can see it inside of the case below, and see how it fits into the back bearing race and reverse gear.
14081
Starting to understand how all this works! The end-float here is kind of all about how the Layshaft aligns with the Pinion gear that sticks into the main case. The bearing has a little wobble, but it feels solid when engaged on both front and rear bearings. I ended up using the middle size up spacer so the gears aligned right in the center. The smallest one was fine, but didn't mesh the gears on the centerline. The largest one pushed the Layshaft so far into it's back bearing race that it didn't spin. So, middle sized one it is!

Back to the MainShaft.
I started to assemble the MainShaft, from the back first. I had the two-piece kind of bush for between 2nd and 3rd Gears. There's all kinds of assembly, test end-float, disassembly and repeat, steps here. You're supposed to file down the soft brass/bronze with sandpaper to let the gear sit higher or lower. I had a set of feeler gauges and tried to get the tolerances right. But, I discovered a weird thing. The middle ridge (or larger end-cap, in two piece versions of the bush) had a chamfer machined into it as it met the gear shaft hole...which also had a matching chamfer. They're supposed to sit flush. Well, it didn't quite sit flush, so that means the bush never quite pushes all the way to the bottom. So, no matter how much you sand/file the bottom of that bush...you're not increasing the tolerance. I confirmed this by softly tapping down the bush and noticed a cut mark on the chamfer where it was rubbing. In the end, I was at about 0.009 when the manual says 0.004-0.007. This was with the smallest spacer. I don't know if this is just bad BritPart machining, or if the brass bush is meant to "wear in" on the first couple hundred miles. I figured I would drive it slow for the first few miles and watch the temperature. Those brass bushes are SO soft, I could buff out dents and scratches with 1000 grit sand paper...so I figure it will rectify itself with slow use. I even thought of maybe bench spinning it a few thousand revolutions just to "seat" everything and "wear it in" nice. Any thoughts out there, Rover experts? I'm all ears.
14082

The other weird thing is that the parts were so tight tolerance machined , that the gear BARELY spun on the brass bush. Without the pin securing the brass bush, the bush spun on the steel shaft. But, after you get all your end floats confirmed, you're supposed to put the pin into the MainShaft and then the bush has a little notch that slips over that. The bush now no longer moves, and the GEAR is supposed to spin. Well, that bush(ing) is so tight on that gear that I have to muscle it around to spin. I spent a good 10 minutes working it back and forth to polish the brass bush. It eventually became easier to spin. But if I hammered any of the parts down, I could easily seize the whole assembly. This was concerning. Again, I worked it for another 10 minutes and it spun easier. I suspect I will have some brass powder out of my first gear oil change. I'll try to take it easy on break in. Is this normal?

...part 2 following this... (RN forum only letting me attach 8 images at a time)...

vlad_d
08-15-2022, 07:57 PM
Week 11.5 (part 2)

Front half of the MainShaft
The rest of the MainShaft goes together. There's another spacer here, which you check when you have the 1st & 2nd Synchro on, and also without it on to check if the bush it sits on will be in tolerance. This is held on with the "taint of the devil" spring clip. I am glad I bought 5 of these. I ruined 2 of them! Always buy 5x for these clips and retainer things...they are often $0.35 each, and it's good insurance, because you'll either destroy a few or they will fly off into the garage somewhere and be gone form this dimension! I tried all kinds fo tricks to get them on: slide them over a wire, use C-Clip pliers to expand them, use flat-head screw drivers to pry them on, etc. All these methods stretched them beyond their limits(instantly ruining them) or didn't work. The only way I got it to work was with two vice-grips on the ends and just gently pry them apart as I pushed down to get them to slip down. Any more pressure and you risk making them oval/ellipse, and then they don't lock anymore.
14070

After I got all this fit up and snug(tap the spring clip in with a metal punch all around to make it seated nice), I turned the whole MainShaft over and tapped it here and there with my brass hammer to release any pressure. I was hoping this would work like you do for U-Joints...where you don't want everything sitting right up against the C-Clips. So, I hoped that would distribute the sliding bits more evenly in their tolerances(end floats range). Spinning it after revealed it was a little looser. I still spent a good 5-10 minutes spinning everything. Seemed to get easier the more I did it - but it's still tighter than I would like. It's definitely not a "one finger" flick to spin each gear. More like a full grasp with your hand and force it to spin. I really do hope that it gets easier as it wears in. Is this normal? I hate to have to order new parts (and wait another 3 weeks).

Finally, I put the Mainshaft into the case, driving it into the bearing at the back. I was expecting this to be harder, but it went in really easy once you move the reverse gear out of the way. So, do it with the main case sideways (so the reverse gear won't try to fall back from gravity). And just get it past the reverse gear, and into the large rear bearing that goes through the case.
14071
14072

Then, put the Layshaft in. Same situation here. Do it with the case side-ways so that you can clear Reverse gear. With Reverse out of the way, it's easy to find the alignment. Here is a pic with both shafts in...
14073

And finally, put the 3rd/4rth Synchro unit (a beautiful object) onto the MainShaft. Put the roller bearing on after. Put the Primary Pinion gear onto the Layshaft (loosely) for the next step.
14074

The next step will be meeting up the Bell Housing with the main case, and trying to mesh up the Pinion gear with the end of the Layshaft's gear...and tucking the MainShaft's roller bearing into the recess of the Pinion gear sticking off the Bell Housing. But, I forgot to order one of those threaded studs for the top-left bolt hole...so I have to wait before final assembly.

While I wait for parts: What sealant do you guys like to use? I heard you don't want RTV because globs of dried Silicone can gum up the gears. But I don't want leaks. Saw one post say Locktite 5980? Anything I can get at the local O'Reilly's? I hate to order this $40 a tube stuff that's just the same thing as Permatex or Form-a-gasket but British. "Chestershire Sealants: For the finest locomotive, steam ship and horseless carriage parts. A trusted source since 1890!"

vlad_d
08-17-2022, 02:05 PM
Week 12 Update

I decided to post at the beginning of the week, to give more people time to reply before the weekend(when I would use the advice)...Like many, I work during the week and build my Series on weekends. Hoping to get this resolved this weekend...

Bush troubles
I can't get it out of my head how hard that bronze bush/gear for 1st and 2nd is to turn. I watched a few more assembly videos (Jeffrey Corker series is fun, too). In all these, the gears spin like skateboard wheels. Mine requires a gorilla grip on the gear with your hand and muscle(marking your bare hand). That's not right!

Clearly, either the ouside of the bronze bush I have is machined wrong or the two gears are machined wrong internally to give enough tolerance to spin freely. Playing back my assembly process in my brain, I remember having a tough time first seating the bronze bush into the first gear. This was early in the endfloat check process, and admittedly my first gearbox. I didn't think much of it, because the fit against the mainshaft was excellent. I assumed the gear was pressed into the bush and both spun on the mainshaft(like the reverse gear is set up). I was wrong. At the end of final assembly, you drive a pin in the mainshaft that engages the bush...and the bush never spins again. So the spinning happens between the gear and the bush, not between the bush and the mainshaft. Great. I know that now. But it was literally a press fit! I used a brass hammer to tap it in. Brass is so soft, this compressed the bush a bit along the edge closest to the inner hole. It made the fit even tighter, as parts of the inner race bulged inward, making the diameter of the hole smaller in places. After working it by had, I could see rubbing below the dents from the hammer. I polished those out with 1000 grit sand paper. It was back to the original fit(still tight, but not seized). Then I had other problems listed below. Now, I want to reduce the outside diameter of that bush, to give space for the gear to spin freely. It's so close! I feel like 10 minutes of lapping or sanding and it will be perfect. But how to do it? I'm not a machinist, nor do I have a lathe.

Lapping the bush?
I had the idea of just running it slowly, to let the brass wear against the harder steel. I read a forum where another guy did that and snapped/mangled the bush as everything seized as it heated up and expanded. I don't want that.

Then, I thought maybe I could set up my drill press and an alternator belt to turn that gear for 10 minutes all out in the open. I could spray it with brake cleaner to flush out the brass powder filings. My version of a poor man's lathe? I thought this might be bad for the mainshaft, prematurely wearing it on the part facing the apex of the belt.

I thought maybe a soft abrasive might be better. Toothpaste? Okay, I'm better then that. I looked into Lapping Compund for valves. Well, I guess that bronze bushes are porous. So the compound you use for valves would get embedded into the bronze...and then the bush becomes a grinding tool against the gear. Yikes! No. I don't want that. I guess you're advised to use Garnet stone Lapping Compund for that.

But then there's the advice that - if you try to hand Lap something, you're likely to get off-cylinder shape. So, you're likely to make it slightly hour-glass profile, or conical. Ugh!

So now, I'm contemplating getting a new Bush and/or/both taking my gears and bush to a machine shop to have them professionally lathed for a good fit. Why are Land Rover parts like this? I've never owned a vehicle where I have to machine brand new parts pretty much 50% of the time because of poor fit. My Chevy, Pontiac, Jeep...never happened in 25 years. Land Rover? 1 out of 3 new parts is just out of tolerance?!

What do you guys think? This MUST have come up before for someone else.

vlad_d
08-21-2022, 05:21 PM
Week 13

Bush troubles resolved.
Didn’t get any advice this week, so I decided to go to some local machine shops. First one couldn’t do it, so I asked them where they go when they need that type of thing done. They referred me to a racing shop across town. I walked into the racing shop - a cool place with hopped up Italian sedans and tubular frames. The owner is “out racing and won’t be back for a week.” Must be nice. I had a talk with a guy welding on some aluminum heads in the back, and he referred me to a place 2 cities over that I’d been to a number of years back. Went there with my gears and brass bushes and explained my problem. The guy in the back lapped them slightly and they worked much better! Asked how much? He said it’s free. Car people can be amazing, sometimes. So many characters and good folks helping each other out. I gave the guy $20 tip.

Back home, I assembled the main shaft again. Before I put the spring clip in, everything rotated fine. After the spring clip went on, it was tight as hell. I was really bummed. So, I took matters into my own hands. I went to the auto parts store and bought a long v-belt (alternator belt). Put it on the gear, and flushed out the gear oil with brake cleaner. I wanted no lube, just friction. I spun the gear back and forth with the v-belt. Took it all apart and looked at the “witness marks” where it was rubbing. I also noted that the spacer piece under the spring clip rotated a slight bit(it’s keyed into the main shaft, so it doesn’t go anywhere). This told me there’s clearance/end float. But the bronze bush is so tight on the main shaft as to be a press fit. I saw witness marks on the inside of the bush, the outside, and the top.

Grinding
Seems Series ownership requires a $10k lathe, but I don’t have one. So, I make due with 400, 600 , 1000 grit sand paper and a glass plate. Same as sharpening my woodworking chisels and planes. I took the end through the grits, and removed the witness marks. I used 600 grit to polish the parts rubbing. Just enough to remove the marks. Put it all together, and worked it again…look at the marks…polish again. I did this about 5 times. I also didn’t like that the mainshaft seemed to scratch the bush every time it went on. This is a brand new, freshly machined part..so it was bur sharp. I took some 400 grit paper cut into strips and did a “shoe shine” polish on the mainshaft, too. Mainly to just get rid of the burrs. After this, the bush fell onto the mainshaft by gravity…no rubbing. Dit the same process to the outside of the bush until all parts spun nice and left minimal witness marks. I think this is me manually “breaking in” the parts, without the risk of the gearbox heating up. Cleaned everything up, re lobbed and re assembled. Everything spins great now! Checked end float and I’m at 0.004”, right in range.

The moral of this story is: when getting 100% néw parts that have never worked together, expect some machining artifacts. At least with Land Rovers, that is.

One piece bush or two piece?
A mystery to me is the one piece vs two piece bush on the mainshaft. 100% of the rebuild videos and forum posts show this part failed, and sheared into 3 pieces: the front part under 2nd gear, the collar separating 1st/2nd, and the back part under 1st gear. So, LR now superseded this with a 2 piece. Like “it’s going to break anyway, so just make it 2 pieces”. The part that confuses me is the oil flow. Oil channels and holes are only on the outside of the bush(between the bush and gears). In the 1 piece, the entire bush is held onto the mainshaft by a pin. It doesn’t spin. The spin happens on the gear. In the two piece, it’s the same, but nothing stops the piece without the collar from spinning. So, it spins on the mainshaft with no lube. This sounds like an obvious point of failure. What am I missing? I feel like I’ll be doing this gearbox again every 2-3 years, replacing this part. Is that your plan, Land Rover?

Next problem…something else is seized.
Finally got all my parts in, and proceeded to put the bell housing on. Earlier in the post I dry fit the layshaft and bell housing to check end float. I know it fits perfectly smooth. I put the mainshaft in now…got all the bits together the right way and put a gasket in. Tightened the bolts and layshaft screw. Everything is seized! I took it apart after 24 hours and checked everything. Reverse gear and 1st gear were engaged at the same time. It’s possible without the shifter mechanism stopping this. I scrapped all the gasket goop, confident that I resolved it this time. I put it all together again, fresh new gasket covered in goop. I tightened down all bolts. Move reverse out of the way with a long screw driver. Made sure 3rd/4rth synchro is centered, and slid 1st/2nd synchro to first(it kinda falls there by gravity on the bench, upright). Still seized!! I back off the bell housing bolts, tap the housing forward off the gasket…everything spins. Not fully, but it clicks back and forth maybe 5-10 degrees of arc. Tighten the bell housing bolts, and it’s seized again.

I don’t know what to do. Everything dry fit fine. At least it LOOKs like a complete gearbox:
14083

I’m hoping it’s just my understanding of the gear shifting that’s wrong. Going to leave it another week while I learn some. Any help, much appreciated.

roverp480
08-22-2022, 03:10 AM
A couple of things come to mind , have you got the end float on the Layshaft correct and am I correct that it is seized even with the gears in neutral . It may be worth fitting the main output gear onto the rear of the box and tightening its retaining nut to make sure the main shaft is pulled hard against its rear bearing. I vaguely remember when I built up a box 20 years ago that if the end float and the position of the gears on the layshaft were not 100% it jammed the constant mesh gears.
14084
14085

vlad_d
08-25-2022, 03:31 AM
Thanks @RoverP480, I got excited and did what you said...tightened up the castleated nut on the back to try and seat the mainshaft better. I was avoiding this part until I had the transfer case out. Seems there are two part numbers for these tin-y "Oil thrower" things, depending on which transfer case you have...and I didn't want to smash them before I knew which one I needed. But I threw one of them on there and tightened the castleated nut(a true pain, even with the gears seized). Dang it, it's still seized. I took it all apart and I'll have a good look again this weekend.

Good thing is I got a 10 pack of those bellhousing-to-casing paper gaskets. Ruined 2 already.

Side question: Do you folks use gasket sealer on that gasket? Or smeared in grease and just put on? I've always used gasket sealer on American cars. But a lot of these LR paper gaskets go on dry or with just grease to hold them on while you tighten bolts elsewhere on the truck(swivel balls, hubs, etc). Gasket sealer sure complicates meshing up the pinion gear to the layshaft gear. Seems to get all over my hands while I'm reaching around in tight spaces! Also, it's a 1 shot thing, and I have to scrape it off between tries. I'm inclined to not use it...but I'd hate to leak gear oil there. When's the next time I'll have it all apart again after its installed in the truck, right?

I have the smallest of three distance pieces on the layshaft (0.125", I think).

I can't work out how reverse is supposed to work. It seemed jammed. Looks like it will fit either fully forward, or fully back...but won't clear 1st/2nd Synchro. I mean, the Synchro/layshaft won't turn...so maybe it would clear if the gear teeth meshed and it could slide by?? It's hard to see in there with the bellhousing on. I even got a small ear wax pen camera in there to see.

The worrying thought I have is maybe the brand new bellhousing is machined wrong...maybe slightly askew, and pushing the shafts over a bit? It wouldn't be the first time a brand new aftermarket LR part was machined wrong. Meshing up the pinion gear and layshaft is the usual pain...but even when I do get it lined up...the last 1/4" doesn't want to go. I chalked it up to having to press in the layshaft to the bearing. But I wonder if something is just going in crooked? I have to use the bellhousing-to-case bolts to drive it down the last 1/4".

Also, a couple times I offered up the mainshaft, I tilted it down a bit and everything just slid off the back. So maybe I don't have everything seated? Those 1st/2nd Synchro brass pieces just fall off like bracelets. It's like I have to keep all the back half together while driving it into the bearing. Gravity is not my friend. The best position to keep it all together is with the front side of the casing pointed down. That puts the mainshaft loose bits on top, held in place by gravity. But driving it in like that is near impossible. Maybe I'll use the castelated nut and an impact wrench to "draw it up", like RoverP480 said.

Oh well. I guess I'll try again next weekend.

roverp480
08-25-2022, 09:58 AM
You say its only when you finally tighten the 4 bell housing bolts that it seizes solid. How about just fitting the bell housing without the layshaft and see if it seizes , if it does its something to do with the primary shaft and mainshaft & not the layshaft. You shouldn't have to " Pull" the two pieces together with the bolts. Something is stopping it if you do need to , and it should go together, perhaps with a tap with a mallet, but nothing else . Just an obvious point, is the reverse gear fitted the correct way round? I think you need the reverse to be forward , to get the first speed gear on the layshaft around it, to align up the roller bearing. It should, if in any one gear or neutral all spin easily. I have had in the past one of the rollers on the rear layshaft bearing tip when trying to assemble, and stop the shaft going fully into the bearing. Just a thought, will it turn freely with just the mainshaft , reverse gear and layshaft assembled into the main box, ie without the bell housing with the First motion shaft ? I am just trying to eliminate and obvious clashes .

vlad_d
09-01-2022, 04:19 PM
Week 14 Update:

Troubleshooting...
I had a good "stare and fiddle" at it this week. Sometimes, you gotta just look at something for a few days to sort it out. There's so many bits that could go wrong, it's hard to relay over a forum post. I also tripple-checked my part numbers. I definitely have the right parts. But I think I identified 3 points of "binding". Some are obvious. Some are subtle. Let me know what you folks think.

Binding #1: Reverse
This one is by design. If reverse slides to the rear of the casing, it is enguaged...and will "fight" any forward gears. Obvious, I guess. The trick is sliding reverse by the 1st & 2nd gears on the back of the mainshaft. The gears have to mesh for an instant so that reverse can slide through. My mistake was trying to grab the mainshaft and spin it to let reverse mesh with, and slide by 1st. Mainshaft was siezed(by reverse) so it wouldn't spin. But - and this is the key- the mainshaft assembly spins at 4 points(gears) along the shaft. So, you don't spun the mainshaft...you slightly spin 1st gear to create an opening for reverse to slide by. It's like a "crash" shift, with no synchronizer...just gears touching and pushing by. Once you do this, reverse slides by no problems.

Binding #2: Oil thrower(s)
I noticed when I tightened the Castel nut on the back of the mainshaft, it seized the mainshaft. The parts catalog shows 2 different part numbers fir a tin "oil thrower" on the back. This oil thrower goes right up against the oil seal.I have both on hand. I compared them:
#232415
#FRC5116
They are matched with different transfer case numbers. I can't really tell, but FRC5116 is smaller in both diameter and thickness(see pics). I tried both. Both pinch the output gear against it and bind up the mainshaft as you tighten the Castel nut. Seems wrong, because that nut needs 50/60ft lbs? It seizes at about 20 ft lbs. Any advice here? I left it hand tight while I work.

Binding #3: Synchro suction lock
Now that I saw the gears spin at different rates on the mainshaft(I know, I know, obvious)...I saw that the 3rd gear synchro coupling spins much faster than the mainshaft it sits on. Here is a close up video:
https://drive.google.com/file/d/1hBqJr_s54nVygV22yR5_VJOJLVQhoNl4/view?usp=drivesdk

Well, the Synchro unit -which is brand new machined part - is so tightly machined that it creates a suction lock against that conical coupling. It's like when two pieces of really flat glass come together and if they are wet, they stick together with a suction effect. The Synchro locks itself to that coupling, almost like it's solid. I think this is how the synchronizing works...just the fluid dynamics and capillary action. Anyway, after 3 or 4 turns, it seizes solid! See video demonstrating:
https://drive.google.com/file/d/1h8Ge3UJ1KdTZk-pirlvntMw98hEK7lLl/view?usp=drivesdk

So, I can get it to Bind any of 3 ways without even having the bellhousing on.

#1 is my mistake, so not to worry about.

#2 is concerning. I don't know what to do about that. Does engine force overcome this? Should I put the mainshaft in a press and see if I can get it in a few 0.001" further, to give more room? This feels like a new endfloat measuremnt?(exterior rear?)

#3 seems like #1...like an "as designed" thing. Should I ignore this, and assume shifting gears will resolve this?

Mainshaft might be going in crooked. Also fresh machined, might need bedding.
Another thing I noticed taking it apart 2 or 3 times. The mainshaft can go in crooked. I don't have a press, so I'm tapping it into the bearing with a mallot. I noticed one time I was able to put it in slightly crooked and it wobbled when spun. That's no good. I pulled it out and put it in again straight. I smashed it down with more mallet whacks...then "pulled" it in with the Castel nut. It spins true now, but it got me thinking I might still not have it seated right. I am going to go buy a Harbor Freight hydraulic press this weekend and try to press it in instead.

Also, as with other parts on this fresh new mainshaft...I suspect the front bearing seat might be slightly over-size. Maybe just 0.001". Just enough to make sliding into the bellhousing bearing a little uncomfortable. I will take some 600 grit sandpaper strips and burnish this surface slightly to make it fit easier. As you said @RoverP480, this should just be a single tap with a mallot...not a press fit. I noticed this with other new parts from BritPart. Just a little too tight.

roverp480
09-02-2022, 02:40 AM
Regarding item 3 . The oil thrower should be a light press fit on the spacer bush that fits between the bearing and the drive gear and be clearance to the oil seal . I can only assume that somewhere in this assembly there is a wrong/faulty part .

vlad_d
09-02-2022, 07:42 PM
Hol up!

You mean there's a spacer on the outside of the casing at the rear? Between the bearing and the oil thrower??!!

Here's the parts manual exploded view I'm working with:

14100

Do you mean part 576735? The drawing shows it on the inside?!

vlad_d
09-02-2022, 09:58 PM
Dag-Nabbit!

@RoverP480, You're a genius!!

Part number 502482!

I missed it in the diagram. I ordered it, bit didn't pit it on the back of the output of the mainshaft. Check it out, it's easy to miss. Compare this drawing to the one in the Parts manual:
14101

That image doesn't even show that Effer!

Okay, so now with that metal collar in there:
14102

The output gear sits nice and far away from the oil thrower! Tightening down on the castel/flange nut seats the gear against the collar, which presses the inside(rolley) part of the bearing! No longer pressing against the oil thrower! Ha-zah! You got it, @RoverP480! That was it for #2.

Now the insides spin nice, no binding. Got that flange nut tightened to 85 ft lbs. Still spins nice. One more problem off the list.

Something is still up with the front.

I got the machinist calipers on layshaft end and the inside of bearing. There is about a 0.03" discrepancy in the bearing inside and the layshaft end. Weird thing is I've had the layshaft thru that bearing before. But now, it won't go through full to the end. Gonna investigate there.

Another possibility is the mainshaft end. Going to get a dial indicator on there and see if somehow it's forward too far. Seems likely.

Again, the gearbox spins nice now. Only tightening the last 1/4 to 1/8" siezes the box. It's like the Pinion might be pressing down on the 3rd/4rth sunchro...driving it down on it's race on the mainshaft.

Will figure this out sooner or later. I've got the bastard on the ropes!!!

roverp480
09-03-2022, 03:01 AM
The oil thrower should be up against the gear end of the collar not the oil seal , see attached early S2 cross section , but in essence its the same as yours. I am sure you will resolve it all.
14105

roverp480
09-03-2022, 03:09 AM
Also my extract from my S3 Book.14107

vlad_d
09-03-2022, 06:44 PM
Thank you! I DID have to drive that sucker on there to get it to seat against the oil seal like that. I'll take it off and put a new one on. Luckily, I have a couple new ones. You know, it's much harder when you didn't take apart the old one. I've been building it up on the bench out of new pieces. I usually snap some pics with my cell phone as I take something apart, to double check when putting it back together. With this one, I'm going in cold.

Further inveatigations
I took it apart again. Tried to fit pieces together individually:

* Layshaft fits nice in Bellhousing bearing. Two light taps with a rubber mallot sinks it home all the way.

* I have a pic earlier in this thread where I checked the layshaft in the case and bellhousing for endfloat. Fit like a glove, no problems.

I can eliminate the layshaft.

* The mainshaft spins nice with the main casing and bellhousing about 1/8" apart. As soon as I try to seat the two, it jambs shut. The jambing happens because the Synchro comes down hard against 3rd. I can get it to bind if I drive the Synchro back. Tap it lightly to unstick it...and I'm free again.

* Removed the Synchro and roller bearing collar. Removed the layshaft. Put bellhousing on. It fits great. Slides flush on the gasket surface.

* Add Synchro. Re-assemble. It won't won't go flush, and tightens the Synchro against 3rd.

* Removed the Synchro, and just put the roller bearing on (no synchro) and re-assbled. Again, it won't sit flush.

So, either the mainshaft is too far forward...the pinion is too far back...or the Synchro and/or roller bearing are too fat???

* What are the chances 2 separate parts are wrong(Synchro and roller bearing)??

* Mainshaft seems to have NO endfloat adjustment in the case(that I can tell) There are lots of endfloat adjustments for the gears that ride on it. But once you get that spring clip on...that's it. That measurement is fixed. There is a distance piece in the back(#576735)...but it doesn't come in different sizes, like the others. Just one part number...one size. So it just has a fixed length, when driven into the bearing in the main case.

* Pinion has some endfloat adjustment. It's just mostly to get the little spacer between the circlip and the bearing to just...bearly...spin. There might be some adjustment here, but it feels perfect. Just rubbing, but able to spin.

* Incorrect part numbers are out of the question here. Pinion, mainshaft and 3rd/4rth Synchro are all the same for Suffix A+B+C. There literally is no other part number. Different drawings, but the part number is the same. I didn't order Suffix D (ECM plated) parts...so it's literally impossible I have the wrong parts. But, could be bad machining(not the first time).

I was thinking of rubbing down the distance piece (#576735) on the back of the mainshaft. I could adjust the fit. But I'd be guessing. I wish I had detailed measuremnts..then I could tell which part is out. Can anyone measure theirs? If you have a disassembled gearbox laying around?

1) Pinion gear end-to-gasket surface distance.
2) Lengrh of 3rd/4rt Synchro.Brass to brass.
3) Length of roller bearing.
4) Depth of the mainshaft, from gasket surface.

roverp480
09-04-2022, 03:48 AM
Given there is a 1/8" gap you are trying to close, it seems to me that is a lot more than a tolerance stack . Some part or parts are either incorrect or not seating properly. Even though you have ordered the correct parts , there is still the possibility one or more are wrong. Looking at the picture you posted showing the oil thrower, the mainshaft nut 217477 doesn't look to be screwed on far enough, I believe there should be a couple of threads exposed when tight, is something not seating properly along the shaft? Given your statement "* Removed the Synchro, and just put the roller bearing on (no synchro) and re-assbled. Again, it won't sit flush." , is the roller bearing you refer the one into the 1st motion shaft or did you mean the main ball race at the rear of the mainshaft?
I have just come across video clips which may be of help eg https://www.youtube.com/watch?v=S-CyOvRJQo8

vlad_d
09-12-2022, 07:12 PM
Geoffrey Corker videos are great. Very funny guy. I've seen these.

The roller bearing I was talking about was the little plastic one that sits on the front of the mainshaft, and is cupped inside the Pinion gear. Part#6397.

I'll try a hydraulic press to seat the mainshaft. That HAS to be it. Even though I drove that sucker in with a sledge hammer and wood block(to protect the shaft). Maybe get some PlastiGuage putty to see if I'm getting flush seat down in there where I can't see.

roverp480
10-01-2022, 02:39 AM
I have just been following a post on the LR S2 Club forum regarding 3rd/4th synchromesh parts. The post is from a well respected member who has rebuilt many gearbox and used to work for Land Rover. https://www.series2club.co.uk/new_forum/index.php/topic,12157.15/topicseen.html
" In answer to Craggle's question about how to spot a dodgy one from a genuine one, the answer is not easily! One area to look is how well the brass rings sit on their respective gears. If they don't sit comfortably against the brass ring, it means they can't engage properly in the teeth. That sometimes manifests itself as an extremely tight box which moves better when you slacken off the bell housing.
On a genuine new synchro, the brass ring grooves feel smooth, but the ridges are clear and obvious. On a copy ones, the grooves can feel sharp and almost abrasive as if they haven't ben finished properly."
Just thought it may have a bearing on your problem