-

I finally got around to drilling out one of the front doors for the new "anti-burst" door latches.
Since I have documented the previous steps and findings, I'll post some more pictures of the process:
It seems the forum only has a 20MB total limit on photos, so I am having to crop these together to save my space.
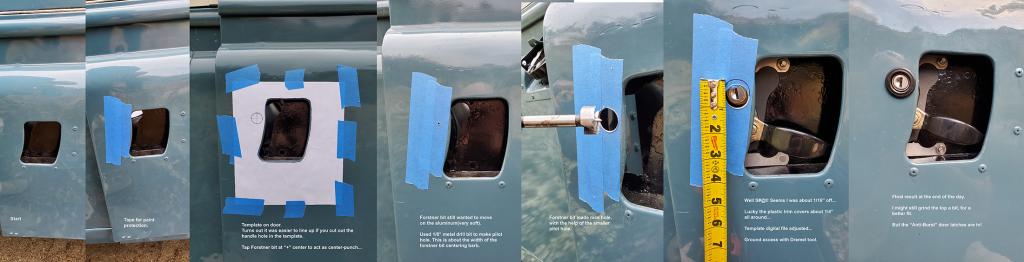
1) I put some tape on the area to be drilled, hoping to save the paint job a bit.
2) I found that it was easier to match up the template to the handle hole that I was using for registration if I cut out the hole in the template with a razor blade on some cardboard before trying to line it up.
3) I decided to try a 7/8" forstner bit, because they make really nice holes for woodworking projects. Looking around on metal fabrication websites, I saw that aluminum is soft enough to use these. And it worked great.
4) I put the centering barb on the drill bit on the "+" center, and tapped it with a wrench to act as a center punch. I didn't want to really dent it, more like poke a hole in the tape and paint...
5) Even with the center punch, the drill bit wandered a bit. So- [ProTip] - use a self-centering metal drill bit and drill a 1/8" pilot hole. The centering barb on the forstner bit was about that thick at the bottom. And, with that centering hole drilled, it didn't wander any more.
6) The hole profile was drilled fast and clean.
7) Aw crap! I guess I was about 1/16th off. The plastic keyhole trim covers about 1/4" over, so we're good, it will hide any difference. I purposely put the size of the lock cylinder hole as the smaller one from my factory rear door (see previous post, the new plastic trim is larger). So I planned to enlarge to fit. Used a Dremel and metal grinding bit to enlarge and re-center to the area marked in sharpie pen. I went back and updated/edited the previous post's attached template to account for this difference.
8) Getting the trim piece in is finicky. There are two retention tabs on either side, but they hit the lock cylinder when trying to compress. Maybe put the trim in first, then the lock? But I had taken the door latch off and on about 8 times to adjust the fit and action, so I was not going to take it all off for a plastic trim piece. I used the Dremel to grind down the plastic inside a bit.
9) I had to pack it up for the day...but I might play around with the fit of that trim piece later. They are cheap, and I might buy another one and shave the key cylinder hole a little bit more for a better fit. But that basically finishes the installation.
For those not familiar with the difference between Series 2 & 2A standard door latches and "Anti-burst" door latches - I made up a comparison pic:
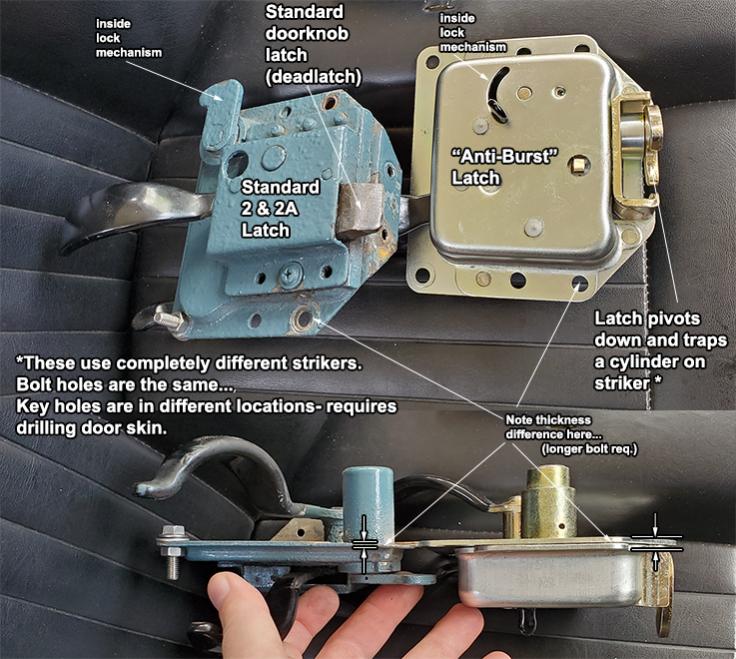
Latch Comparison:
The big differences are that they use a completely different striker, and the door key cylinder is in a different place - which necessitates drilling out your doorskins (or buying doors pre-drilled for said locks).
The bolt pattern is the same, which is nice.
Issues, always Issues...
On the Proline latches I got, the bottom hole closest to the latch mechanism was about 3x as thick as the standard one installed on my Series 3.
This was a problem using the new stainless steel plate with bolts pre-welded in place.
There seem to be two kinds of these plates:
* One of them has a flat profile presented to the outside, with a threaded rod going inward that you attach nuts to.
* The other has a nut welded on, and you put bolts through.
The one with no visible hardware on the outside makes sense for using on the bottom, because it's visible through the handle hole - but on my set, the threaded rod is too short to spin a nut on in that thicker hole highlighted in the pictures above. So, I had to use the first kind, with the welded nut on the outside, because it came with longer bolts.
[Pro Tip] Get both types. They are cheap and good insurance in case your door is slightly wonky.
Finally:
Also, to wrap up this project, I guess I should also mention that I had to rebuild the sheet metal under the door latch.
In case any of you have to do the same, here's a quick break-down of some steps I took, and a photo:

1) The door skin is aluminum (yeay!) but the frame and loor latch mounting area is steel (booo!)...so it rusted. Also, the previous owners had bad alignment on the latch, so they clearly slammed and pushed it shut enough to where the sheet metal ripped away. I had only 3 holes to bolt to.
2) So, I ended up using the door latch gasket as a template, outlining it with a sharpie on some 22 gauge steel and drilled and cut with tin snips. Fit to the missing pieces.
3) I did some test spot welds, then went around adding small tacks until I filled most of the area. It's tricky with this thin of metal as you burn through more often than weld.
4) Grind it down with the Dremel tool and hand file, then sand-paper to make it flat enough to not affect the fit of the new latch. Kind of ugly for body-work, but it will be hidden behind the door latch!
5) Primer and some automotive black paint so it won't rust agiain. I actually kind of like the way the black looks from the outside - it blacks out the door handle hole, and matches the black on the headlight panels. I might keep it that way.
I think I am spending too much time trying to save these doors!
-Cheers, thanks for reading.
Tags for this Thread
 Posting Permissions
- You may not post new threads
- You may not post replies
- You may not post attachments
- You may not edit your posts
-
Forum Rules


 Reply With Quote