Rear tub quarter replacement.....Success (I think)...Pictures of today's project!!!!!

Collapse
X
 
  • Time
  • Show
Clear All
new posts
  • knac1234
    4th Gear
    • Nov 2010
    • 442

    Rear tub quarter replacement.....Success (I think)...Pictures of today's project!!!!!

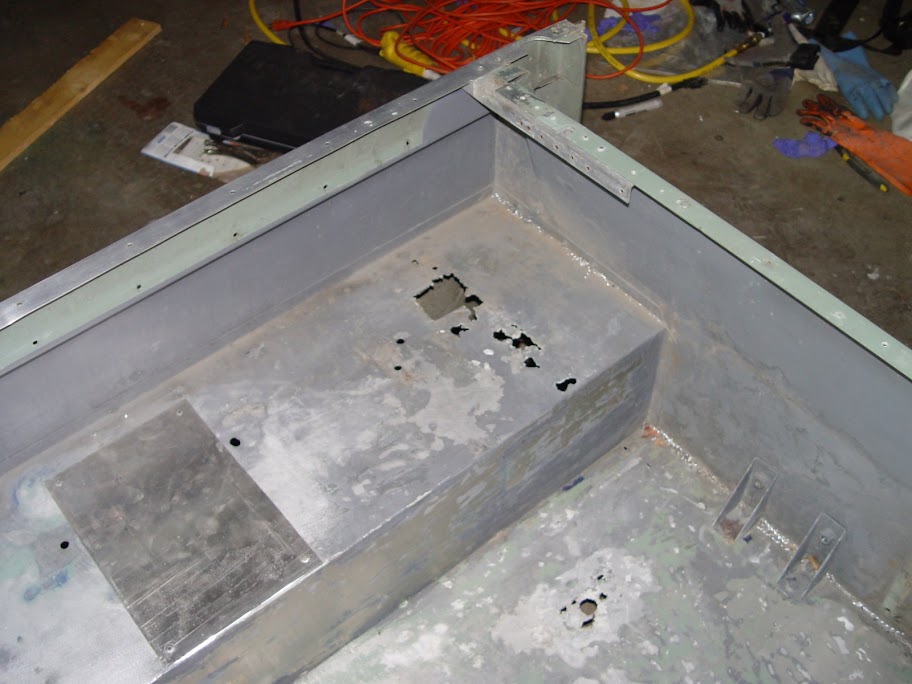
    So, this will be this weekend's project. I will be replacing the right side quarter panel due to that riveted repair panel under the gas filler assembly and also corrosion around the circled riveted areas.

    I have been advised from multiple sources to eliminate the Series III seatbelt reinforcement brackets.

    Are those to be found behind the red circled areas? I am hoping to eliminate these sets of rivets.

    The right side will be a new panel, but the left side I will have to cut out these sections (as the same corrosion exists in the same 3 areas), replace from panel from behind as did Martin on this board, and use a thin film of skim (could locate no LH panels anywhere).

    Please let me know if all 3 red circled areas can be removed.

    Thanks!
    Julian

    Last edited by knac1234; 08-06-2011, 09:37 PM.
    Julian
    72 Series III NAS
    03 Disco
    04 Freelander (sold, but still running strong)
    2011 LR2 (Fuji White/Tan....per the wife )
    65 MGB / 73 MGBGT
    71 RHD Hillman Super Imp
  • crankin
    5th Gear
    • Jul 2008
    • 696

    #2
    Yes. Those are the ones. You can go about removing them by hitting them with a chisel on the backside and then tap them out....or...drill them out. They are steel not aluminum. There are also some rivets on the tub that you will have to drill out.


    In addition: the seat belt anchors (on the inside of the tub) are a real pain in the butt to remove. I had to cut a section of by tub out and drop them that way.


    Birmabright Brotherhood

    Take the vow, join the brotherhood!


    Clint Rankin - 1972 SIII SWB

    Comment

    • cedryck
      5th Gear
      • Sep 2010
      • 836

      #3
      Your galvanic corrosion holes are small. The tub I took off of my65 ex mod was way worse.

      Comment

      • knac1234
        4th Gear
        • Nov 2010
        • 442

        #4
        Crankin-Thanks for the pics. This confirms what I am going to do (or try!). Did you affix a piece from behind as I am planning, and then use some light skimmer? By the way, unbelievable job on your S3 (I looked through your picture link).

        Cedryk-Yes, they don't appear bad at all, but I want to eliminate the source of the problem so they don't get worse. The tub will be in-situ, so I am hopeful that access will be fine by at worse removing the rear wheels.

        Cheers,
        Julian
        Julian
        72 Series III NAS
        03 Disco
        04 Freelander (sold, but still running strong)
        2011 LR2 (Fuji White/Tan....per the wife )
        65 MGB / 73 MGBGT
        71 RHD Hillman Super Imp

        Comment

        • crankin
          5th Gear
          • Jul 2008
          • 696

          #5
          I did take a piece and stick it behind and then had a buddy weld it up. For the inside of the tub...in some of the pictures you can see that I pop riveted a piece of aluminum over the holes.

          Thanks for the compliments!


          Birmabright Brotherhood

          Take the vow, join the brotherhood!


          Clint Rankin - 1972 SIII SWB

          Comment

          • knac1234
            4th Gear
            • Nov 2010
            • 442

            #6
            Thanks for the compliments!
            Well deserved! Hope mine ends up half as good!


            Julian
            Julian
            72 Series III NAS
            03 Disco
            04 Freelander (sold, but still running strong)
            2011 LR2 (Fuji White/Tan....per the wife )
            65 MGB / 73 MGBGT
            71 RHD Hillman Super Imp

            Comment

            • knac1234
              4th Gear
              • Nov 2010
              • 442

              #7
              Here's a look at today's success (I think).

              After removing the roof and sidepanels for the first time ever (pretty easy but for 2 nuts covered in roof gutter sealant), the trim and lamps came off. I then drilled every spot weld out and tackled the seatbelt reinforcement areas by cutting around them (whatever rivets were used were made of an alloy unknown to man!!). Seatbelt reinforcements were then removed (I was able to wrench the loop hooks in the bench seat area out and the supports then slid out as seen in the pics!). Finally, had to drill the side lamp assembly holes and the holes for the fuel galvy trim in the new panel.

              The panel is now riveted in place (under the galvy trim areas and in the door jamb covered by the rubber seal that will go back there). Now just have to wait 24 hours....hopefully nothing falls off! It's clamped in place pretty well with 2x6s and other creative things!

              Incidentally, I expected to find a big dent under that riveted on panel under the fuel filler. Wrong....NOTHING....no dings, nice paint....why would someone rivet that there?!

              Thanks for all the help. I MAY attempt the left side as I might have found left panels.....or may try to salvage the left side tomorrow first.

              By the way, the pneumatic pop riveter I bought from Harbor Freight was awesome! Should have bought it years ago! Just got to get a hammer riveter now.

              Cheers,
              Julian


              Julian
              72 Series III NAS
              03 Disco
              04 Freelander (sold, but still running strong)
              2011 LR2 (Fuji White/Tan....per the wife )
              65 MGB / 73 MGBGT
              71 RHD Hillman Super Imp

              Comment

              • SafeAirOne
                Overdrive
                • Apr 2008
                • 3435

                #8
                Nice job. I may have missed it somewhere--Did you use panel adhsive on the wheelwell-to-tub joint?
                --Mark

                1973 SIII 109 RHD 2.5NA Diesel

                0-54mph in just under 11.5 minutes
                (9.7 minutes now that she's a 3-door).

                Comment

                • knac1234
                  4th Gear
                  • Nov 2010
                  • 442

                  #9
                  Yes Mark, I used 3M 8115 panel adhesive as recommended by Ted on here who did the same job. So, between the rivets holding it in place and the adhesive that is supposed to be impossible to remove once cured, I am hoping nothing will fall off

                  Was a little nervous when I finally got the panel off, all hacked up. That was the point of no return

                  Julian
                  Julian
                  72 Series III NAS
                  03 Disco
                  04 Freelander (sold, but still running strong)
                  2011 LR2 (Fuji White/Tan....per the wife )
                  65 MGB / 73 MGBGT
                  71 RHD Hillman Super Imp

                  Comment

                  • LaneRover
                    Overdrive
                    • Oct 2006
                    • 1743

                    #10
                    Is there any chance that the panel under the filler cap was there to protect the side from filling from Jerry cans?
                    1958 107 SW - Sold to a better home
                    1965 109 SW - nearly running well
                    1966 88 SW - running but needing attention
                    1969 109 P-UP

                    http://www.facebook.com/album.php?ai...2&l=64cfe23aa2

                    Comment

                    • Jim-ME
                      Overdrive
                      • Oct 2006
                      • 1379

                      #11
                      I kind of wondered the same thing except that it may have been put on to protect the panel from being chipped by the fuel cap and the chain the holds the cap to the tube. When you let the cap dangle off the chain while refueling it will bounce off the panel. That's what happened to my first Rover.
                      Jim

                      Comment

                      • martindktm
                        2nd Gear
                        • Jun 2008
                        • 218

                        #12
                        Nice job Julian!

                        Comment

                        • Skeeball
                          Low Range
                          • Nov 2007
                          • 63

                          #13
                          Very nice job the outcome was worth the effort..
                          I plan on replacing the 2 rear panels on my '64 a job I am not really looking forward to but after seeing your result I am feeling more confidant.
                          I will also need to replace the entire strip that allows the tub to bolt to the rear crossmember there is a lot of corrosion there. Has anyone here done this? its hard to tell but is this 1 piece or 3 seperate ones ??
                          1964 Series IIa In progress
                          1968 S IIa (Sold)
                          1972 S III (Sold)
                          1996 Discovery SE-7 (Sold)

                          Comment

                          • knac1234
                            4th Gear
                            • Nov 2010
                            • 442

                            #14
                            Martin and skeeball-

                            Thanks for the comments! Got to work an hour early this morning and removed the clamps (which meant it had 40 hours of cure time instead of the 24 hours specified).

                            Holds great, so it appears to be successful!

                            skeeball--FYI I have never done anything like this before. It is not difficult at all, so give yours a go!

                            Julian
                            Julian
                            72 Series III NAS
                            03 Disco
                            04 Freelander (sold, but still running strong)
                            2011 LR2 (Fuji White/Tan....per the wife )
                            65 MGB / 73 MGBGT
                            71 RHD Hillman Super Imp

                            Comment

                            • Skeeball
                              Low Range
                              • Nov 2007
                              • 63

                              #15
                              Julian I am concerned about getting everything all lined up once I use that panel adhesive..
                              1964 Series IIa In progress
                              1968 S IIa (Sold)
                              1972 S III (Sold)
                              1996 Discovery SE-7 (Sold)

                              Comment

                              Working...