-
Nick, just my two cents, but if you are going to attempt this yourself I think you should concentrate on one problem at a time. Regarding the brakes, I think you had better determine whether or not you can break free all of the fittings and nuts. That will determine what parts you will need to get. There's no point in rushing to order a brake cylinder if it's the wrong one. Also if you can't free the brake line compression nut or the mounting nuts, then you will need a new line, fittings, and nuts in order to proceed. Once again, make sure you have the proper wrenches to do the job or else you will be rounding over all of the nuts. Pretty soon you will end up replacing the entire brake system. -
Thanks Nium - I'll make a point to stick to this thread only from now on.
I'll work on a better pic tonight, but if it was wired up wrong (I have not changed a thing) why would it have run well for 4 weeks? That site with the animated pics is great - thanks
Does that mean this one that I just installed won't work?
And if not - what about the single circuit orignal 88 cylinder that I replaced - was it just undersized? It was stopping fine until it spring a leak.
Regarding the stuck bleeder - it is fully stripped, now that I've gotten through the rust I can see that its basically round. I ordered an 88 wheel cylinder before I realized that it was an 11" wheel. So now what do I need - a 109 front cylinder or can I use the 88 cylinder that I ordered?Leave a comment:
-
'sup
Nick,
It'd help if you kept posting to the same thread. That way it'd be easier to reference what you've already said and done.
Take a pic of your dizzy from directly above, with the rotor button off. It kinda looks like the low tension lead is attached to the condenser mount. If that's the case then the points aren't opening the circuit to the coil, which wouldn't allow the coil to fire. With the "-" side of the coil permanently grounded the coil would get really hot from the really strong magnetic field it would be producing.
The low tension lead is suppose to be attached to the points so that it isolates the "-" side of the coil from ground. That way the coil's "-" side is isolated from ground EXCEPT when the points are closed. The condenser should be attached to the same place on the points as the low tension lead.
Here's a sight that explains automotive ignition and it has pictures.

Brakes
On the bleeder screws make sure you use a six sided closed end wrench to prevent stripping off the sides of the bleeder screws. PB Blaster is better to loosen frozen threads then WD-40, IMHO.
Some friendly advice. Take LOTS of pictures before you take stuff apart. Then you'll have a visual reminder of what it's suppose to look like.
CheersLeave a comment:
-
Nick... as stated earlier...someone has either upgraded your front brakes or maybe it was an axle swap.
Either way.. I did the same brake upgrage to my Ser III 88 though I've never driven it yet. still slowly rebuilding
In fact the swap I did was exactly what the LR factory did in the 1980's to the Ser III 88's (see pics below)
Pre-june 1980 UK 88's had Frt & Rear 10" drums with a larger front wheel cylinder. F&R drums and brake shoes were the same.
The upgraded 88 system is basically this...
Use 4 cyl 109 11 drums, backing plates, shoes and dual wheel cylinders up front
use the orignal 10 drums, backing plates , shoes in the rear, BUT use the original 88" 10 brake FRONT wheel cylinders. The larger dia wheel cylinder will then boost the rear brakes.
Now to handle the larger rear wheel cylinders and the 11 dual cylinders.. you need to upgrade to a dual 109 brake master cylinder inorder to have the correct pedal volume. You might want to find out what other compnenets you have in the rear and the master cyl.
Whenever I have a stuck bleader the use of a good penetrating oil is step one. Kroil-oil, PB blaster or Howes Lubricant seem to me to be the best.. WD 40 has never done much for me.
You can get a new bleeder, so if it round over with your 6 (SIX) point socket or wrench... you'll need try really tight visegrips. No 12 point tools to be used here. If you are successfull... here are some bleeding tips..
Ref Material for brake setups. though the sketch seems to show the 109 dual cylinders 90 degrees out of position???
Leave a comment:
-
-
the closer I get...
Just went to pull the wheel and realized I don't own a jack that is tall enough - maybe time to buy a floor jack
Going back to the plan of tring to find a local shop. Right now I have a truck that won't start, won't stop and I'm over my head. Thanks for the advice thus far guys!Leave a comment:
-
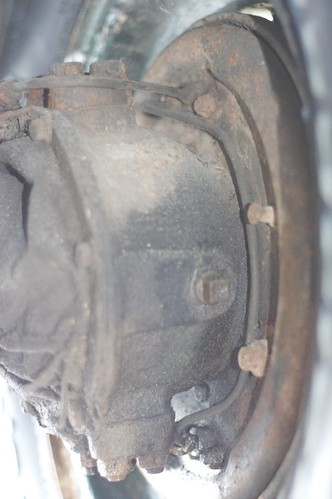
Someone has upgraded your truck to a set of 11" drums from a 109. They do increase stopping power but require a certain skill to bleed properly. You can either modify the line routing to move the bleed screw to the top or remove the backing palte, brakes and all and hold it in an orientation that puts the bleed nipple at the high point of the system.Leave a comment:
-
you have two brake cylinders on the front. one on the top and one on the bottom. the bleeder screw is on the bottom, same as mine. thats how its supposed to be.Leave a comment:
-
Full set here
I'm looking at the 90/110 book I have - these look strangely like defender fronts...
I'd rather someone tell me that I'm just wrong about the location of the bleeder, that its in fact up top and I'm just missing it. Guessing that if they are 90/110 wheels (axle too?) that wheel cylinder that I ordered won't work, is that the case?
Note to anyone thinking about importing a truck: DONT or at least make sure you know more than I did at the time
Leave a comment:
-
Sounds like someone put the lefts on the right and rights on the left....Or upside down. I REALLY would like to see a picture of this!Leave a comment:
-
One more question -
The Green bible's limited diagrams show the wheel cylinders on the top of the wheel. On mine, that is true for the rears. But on the front wheels the bleeder is on the bottom. Does that sound correct?Leave a comment:
-
Agree with this 100% - just trying to find the right buddy. My neighbor is pretty knowledgeable, but is no expert on Rovers. Together we are better than either one of us on our own. Not the same as having a master mechanic, but its a start.
Tell me about it!
Kevkon - I'll get that vacuum line to the advance sorted as well.
Ordered a new cylinder (proline), plugs, points, condenser and cap from our hosts along with a new wheel cylinder in case I cant get the bleeder loose.
I also found the 1-11/16th socket on Amazon ($5 and with their prime service, free shipping) along with a set of feeler gauges
If it ever starts again, it will be a miracle, but in the mean time at least it will have a bunch of shiny new parts
Thanks again folks!Leave a comment:
-
I think it would be wise to invest in the proper Whitworth and other tools if you are going to do your own wrenching. For the bleeders use a dedicated bleeder wrench or a flair wrench. Soak it liberally with WD40 and let it sit overnight, then give it a sharp tap. If that doesn't work then resort to the heat method. Just make sure you have a new set of bleeder valves on hand.
As for the vacuum advance, any vacuum leak in the system can cause problems. Your engine is drawing in air which effectively leans out the fuel mixture. In addition the job of the vacuum advance is to advance the timing under no load conditions ( that's when the vacuum is at it's greatest) as when you are running with the throttle closed. So a vacuum leak will not only allow the mixture to lean out it will also prevent the distributor from advancing the spark to the degree needed under partial throttle conditions.Leave a comment:
-
-
Not that I am a wealth of experience but your trials and tribulations seems to be mirroring my problems with my recently aquired truck (and our mechanical knowledge seem to match up, i.e. near non-existant) so here it goes.
Get a new cap, rotor, points, condenser, wires & plugs, that way you can eliminate those relatively cheap parts as the problem. Keep the old ones incase they were good so you will have spares. I'd do the distributor parts first , if no change in performance then change the plugs, again if no change then the wires.
The bushing your refer to is the vacuum advance, it shouldn't have anything to do with your problems as it only comes into play at higher engine speeds.
I also stripped out my brake bleed screw so I went ahead and installed new wheel cylinders, again not too expensive and now I don't have to worry about them. Actually one thing lead to another and I re-did the entire brake system, remember whoa is more important than go!
My biggest advice to you is to find someone with basic mechanical knowledge (these trucks are VERY basic) and make him/her your best buddy. I was adopted my the mechanics here at the plant and have learned sooo much by their hands-on training/advice that is impossible to convey via this board. Buy them lunch, dinner or free health care, what ever deal you can strike but it very difficult and discouraging to try to trouble shoot alone at our level. I couldn't have done what I've done without hands-on help.
I'd be willing to help you later on but right know I'm finishing my truck (new distrbutor and u-joints go on tonight) and if I start spending time under another truck right away I believe SWMBO may not be very happy. Give me a week or two!Leave a comment:


Leave a comment: